Pete Askew
Admin
I should probably have written this before showing how to load film into a film holder but, I just happened to have a sheet of old film lying around that day. Now it strikes me, partly based on some questions that Hamish asked in that thread, that quite a few people may have wondered what on earth you do with a single sheet of film when you've loaded it into a holder. Well hopefully this will begin to answer that.
Most large format (LF) cameras whether they be an ABS pinhole camera, a ancient mahogany field camera or a modern technical camera are actually very simple things. They are (with the exception of the Ilford Titan alluded to above), simply a plate with a hole in into which a lens has been inserted and a frame that can hold a film holder connected together by a flexible bellows. The plates are usually supported by a frame or rail and they can be move either closer or further apart to allow an image to be projected by the lens onto the film. In many cases the orientation of the lens panel and the film holder can be altered.
The example I will use to illustrate the anatomy of these things is a Sinar C2 (our backup Sinar as the P2 is being serviced). So, starting at the front, we have the lens held in a lens board or lens panel.

The lens mount is very simple and the lens is mounted on a metal plate with a hole in it. This can be done by the user as the two halves of the lens simply unscrew and you just poke the lens through the hole and refit the other half (sometimes there is a securing ring). This means that the lenses are fully interchangeable between systems. What's more, it is possible to fit smaller panels into cameras that take larger ones using a special adapter panel. For example my field camera takes smaller Linhof-type panels and I have an adapter plate to fit these into the much larger plates used by my Cambo and am having a plate made to allow the same with the Sinar (it arrived back today but still needs a bit more machining work to get a perfect fit in the Sinar frame). Here is the panel removed showing the rear element of the lens.
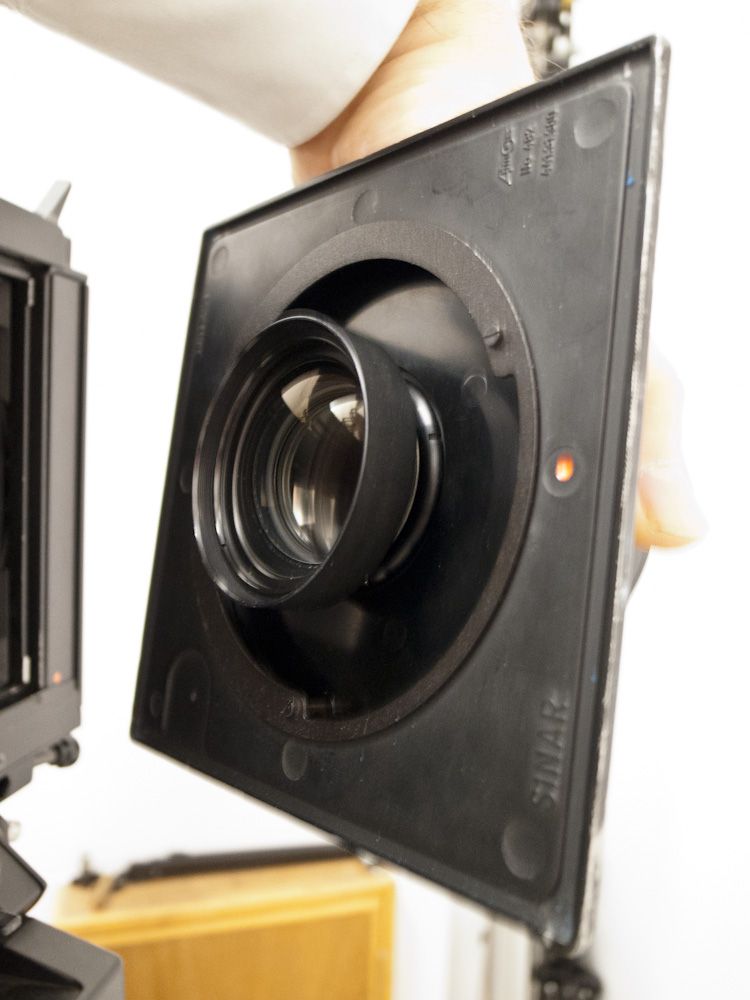
The panel simply fits into a frame.

And held in place by a locking cam (or clip depending on the make of camera).

This frame / panel is mounted to a metal bar (hence these cameras are often called monorail cameras) by the front standard as shown in the first image above. This standard usually has some controls for changing angle height etc and is often identical in its functionality to the standard at the other end of the camera - the rear standard.

This standard again holds a frame (identical to the one on the front) into which is mounted a viewing screen. In this case (and in almost all cases) the screen is incorporated into a thing referred to as a universal sprung back. This is a clever device that acts as both viewing screen and holder for the film holder (and other film backs and inserts). But first a quick look at the controls on the standards.

Now these looks complicated (and some are much simpler in construction but the Sinar is made in Switzerland by a bunch of frustrated watch makers!) but are actually fairly simple. The various knobs drive precise rack and pinion slides that either move the standard towards or away from each other in line with the supporting rail (and so allow you to focus the image onto the screen / film) or they alter the orientation of one standard with other. You can change the height of a standard relative to the other (rise and fall), you can tilt them about their central axis (both vertically - tilt - and horizontally - swing) and offset them parallel to each other (shift). And you do this to either correct parallel lines, change the focal plane or change the shape of an image in some way - and end up with a funny shaped camera in the process!

And you view the effect of this using the screen (with the shutter open - it has a viewing mode - and usually at its maximum aperture - it is often quite dim hence the big black cloth that people use), often with the aid of a loupe.

This shows the shutter speed dial on the lens and below it the lever for locking the shutter open to facilitate focusing (the aperture control is on the other side in this example). The black 'lever' is for opening the shutter and the silver one is for priming (does cock work on the forum yet?) it at a given speed (on most lenses the shutters are mechanical).

So, let's return to the universal back and see how the film holder goes in. It is a sprung back so when you slide the film holder under the focus screen holder the screen 'springs' out of the way and the film ends up at the same plane as the viewing screen was.
Here is the holder part way in.

And here it is inserted fully.

To make the exposure you first close the lens from its viewing setting, set the shutter speed and prime it, set the aperture and then remove the dark-slide from the holder (ideally the one at the front - you're going to make that mistake at least once!!)...

... then trip the shutter either by hand or using a cable release.
Another thing about a universal sprung back is that you can slot other film holders in like this.

In this case, a Polaroid instant film back.

You can also remove the sprung mechanism...

... and replace it with other holders such as a roll film back, in this example a 6 x 7 cm back but there are others such as 6 x 9 and 6 x12 and Sinar make a universal back that you can change the format on using a selector and masks.

You can also fit sliding holders in place of the whole assembly that include a focusing screen that is slid out of the way and a film holder (or digital back) replaces it - but I will come to that in another article when we deal with digital capture with a technical camera.
So that is the anatomy of a technical, and in fact pretty well any LF camera. As I said at the start, they are actually quite simple and comprise a couple of plates with a wiggly bit in the middle.

Most large format (LF) cameras whether they be an ABS pinhole camera, a ancient mahogany field camera or a modern technical camera are actually very simple things. They are (with the exception of the Ilford Titan alluded to above), simply a plate with a hole in into which a lens has been inserted and a frame that can hold a film holder connected together by a flexible bellows. The plates are usually supported by a frame or rail and they can be move either closer or further apart to allow an image to be projected by the lens onto the film. In many cases the orientation of the lens panel and the film holder can be altered.
The example I will use to illustrate the anatomy of these things is a Sinar C2 (our backup Sinar as the P2 is being serviced). So, starting at the front, we have the lens held in a lens board or lens panel.
The lens mount is very simple and the lens is mounted on a metal plate with a hole in it. This can be done by the user as the two halves of the lens simply unscrew and you just poke the lens through the hole and refit the other half (sometimes there is a securing ring). This means that the lenses are fully interchangeable between systems. What's more, it is possible to fit smaller panels into cameras that take larger ones using a special adapter panel. For example my field camera takes smaller Linhof-type panels and I have an adapter plate to fit these into the much larger plates used by my Cambo and am having a plate made to allow the same with the Sinar (it arrived back today but still needs a bit more machining work to get a perfect fit in the Sinar frame). Here is the panel removed showing the rear element of the lens.
The panel simply fits into a frame.
And held in place by a locking cam (or clip depending on the make of camera).
This frame / panel is mounted to a metal bar (hence these cameras are often called monorail cameras) by the front standard as shown in the first image above. This standard usually has some controls for changing angle height etc and is often identical in its functionality to the standard at the other end of the camera - the rear standard.
This standard again holds a frame (identical to the one on the front) into which is mounted a viewing screen. In this case (and in almost all cases) the screen is incorporated into a thing referred to as a universal sprung back. This is a clever device that acts as both viewing screen and holder for the film holder (and other film backs and inserts). But first a quick look at the controls on the standards.
Now these looks complicated (and some are much simpler in construction but the Sinar is made in Switzerland by a bunch of frustrated watch makers!) but are actually fairly simple. The various knobs drive precise rack and pinion slides that either move the standard towards or away from each other in line with the supporting rail (and so allow you to focus the image onto the screen / film) or they alter the orientation of one standard with other. You can change the height of a standard relative to the other (rise and fall), you can tilt them about their central axis (both vertically - tilt - and horizontally - swing) and offset them parallel to each other (shift). And you do this to either correct parallel lines, change the focal plane or change the shape of an image in some way - and end up with a funny shaped camera in the process!
And you view the effect of this using the screen (with the shutter open - it has a viewing mode - and usually at its maximum aperture - it is often quite dim hence the big black cloth that people use), often with the aid of a loupe.
This shows the shutter speed dial on the lens and below it the lever for locking the shutter open to facilitate focusing (the aperture control is on the other side in this example). The black 'lever' is for opening the shutter and the silver one is for priming (does cock work on the forum yet?) it at a given speed (on most lenses the shutters are mechanical).
So, let's return to the universal back and see how the film holder goes in. It is a sprung back so when you slide the film holder under the focus screen holder the screen 'springs' out of the way and the film ends up at the same plane as the viewing screen was.
Here is the holder part way in.
And here it is inserted fully.
To make the exposure you first close the lens from its viewing setting, set the shutter speed and prime it, set the aperture and then remove the dark-slide from the holder (ideally the one at the front - you're going to make that mistake at least once!!)...
... then trip the shutter either by hand or using a cable release.
Another thing about a universal sprung back is that you can slot other film holders in like this.
In this case, a Polaroid instant film back.
You can also remove the sprung mechanism...
... and replace it with other holders such as a roll film back, in this example a 6 x 7 cm back but there are others such as 6 x 9 and 6 x12 and Sinar make a universal back that you can change the format on using a selector and masks.
You can also fit sliding holders in place of the whole assembly that include a focusing screen that is slid out of the way and a film holder (or digital back) replaces it - but I will come to that in another article when we deal with digital capture with a technical camera.
So that is the anatomy of a technical, and in fact pretty well any LF camera. As I said at the start, they are actually quite simple and comprise a couple of plates with a wiggly bit in the middle.
Last edited:
")


