Hamish Gill
Tech Support (and Marketing)
Photography, or at least cameras, like many things in the 21st century have been automated, simplified and dumbed-down to appeal to the lowest common denominator. The worst crime against photography (IMHO) is the almost universal removal of optical viewfinders from compact cameras, making them (despite the manufactures’ claims) nigh on useless in bright sunlight... and for what gain? To make them more compact and aesthetically pleasing is my best guess!
Although the above demonstrates my point, it is actually fairly irrelevant to this article; it is merely to demonstrate to anyone, however knowledgeable about photography, that a lot of "advances" in modern cameras are actually counter-productive to learning how to use a camera properly.
I have decided to make it my goal to redress this balance by writing a few tutorials on how to use a camera properly that even a person picking up a single lens reflex camera (SLR) for the first time can understand.
A good analogy for what I am trying to do here would be learning to drive. Cars have lots of controls, modern cars have lots of controls that you don't need to use! But some of the controls are vital. Take the gear stick. It's very important to know what a gear stick does and when you use it. In most cars you won't get very far trying to pull away from a junction in 5th.... It's important to know, when learning to drive, that using 1st gear to pull away from the junction is a good idea! But do you need to know the gear ratios of your car? No, you need to know what they are and when to use them but not the intricate technical details of how they work. Now obviously you could just learn to drive an automatic car. But sit yourself in a manual car and try to drive and you're going to come unstuck. Do you think the best f1 or world rally champions only know how to drive an automatic car? Probably not! In my opinion, the same goes for photography; if you want to be good at it, and good at it consistently, you must first understand how to control a camera!
In this first tutorial we shall be looking at exposure!
Exposure
A camera, in its simplest form, is a box containing a material that is sensitive to light. If no light hits this material, the end result will be a black photograph. If too much light hits this material the end result will be a completely white photograph. The goal is to find a balance somewhere between these 2 extremes. These days this can be achieved by setting the camera to "auto" and pressing the button. If you are happy to do that then stop reading now! If, on the other hand, you would like to learn how to alter that amount of light to obtain the perfect image, you need to understand three things and the way that they interact:
Shutter Speed
Aperture
Sensitivity
We can divide these three things into two groups to help understand what they mean. The first group, for arguments sake, we shall call:
Mechanical: The shutter speed and aperture are both mechanical ways of changing the amount of light that enters the camera.
The second group (which isn't really a group as it just leaves sensitivity) we shall call:
Sensitivity: Essentially a photochemical process – with light either reducing a silver salt to silver metal (a latent image) in a film camera or creating a potential difference that results in an electrical signal in a digital camera. Sounds technical doesn't it? In simple terms it relates to literally how sensitive to light the material within the camera is. Various films and sensors differ in the amount you need to amplify their response to give you a visible image.... But we shall come back to that later!
Are you with me so far? Firstly, we shall look at the mechanical settings.
Aperture
I said before, by changing either the shutter speed or aperture we can vary the amount of light that enters the camera. We shall start with the aperture as it is the first barrier to the light as it enters the camera.... it’s also the most confusing; but get your head around the following and the rest will come easily ... you’re just going to have to trust me ... ok?
Referring to www.thefreedictionary.com we find the definition of Aperture as
It is, as the definition says, a hole. In the case of photography it is a hole that can be varied in size. This variable sized hole is adjusted by a mechanical set of blades that create an iris diaphragm inside your lens. With a larger hole, more light can travel into the camera. With a smaller hole, less light can get in.
Easy! Well yes it is, but unfortunately there needs to be a way to represent the size of the hole to the user of the lens. And that's where it gets a bit more complicated! Refer, for a second, back to our dictionary definition and we can see that, “b. The diameter of such an opening, often expressed as an f-number. “ So what is an "f-number"? If you want the complicated answer then have a read of this:
http://en.wikipedia.org/wiki/F-number
... yeah ... told you it was complicated didn't I? Well, it doesn't have to be as complicated as all that!
Firstly I need you to pick up your camera! Over the years the way of adjusting aperture has become simpler, but gives less clues as to what is going on inside the camera. Lets first identify how you will be adjusting the aperture on your camera... we can look at what the effect of this is in a moment! Firstly remove the lens from your camera (if you have a body cap put it on the camera now so no dust can get inside). Put the camera to one side. Your lens will have either 1 or 2 rings (3 on some zoom lenses) that rotate around the body of the lens. One of them changes focus while the other changes the aperture. The focus one rotates smoothly whereas the aperture one will click as you rotate it. If you only have a focus control then don’t worry you just have a more modern camera/lens that allows the aperture to be adjusted with the camera.... I’ll get to that in a second... please read on even though the following doesn't directly relate to you... I will get to your type of camera/lens in a second
If you have an aperture control on your lens you are in luck because you will possibly be able to see the aperture physically changing as you rotate it’s control ring. Take the lens in one hand holding the body of the lens not the focus or zoom control. Hold it so you can see the numbers next to the aperture control: these numbers will probably range through 4, 5.6, 8 etc they might go as low as 1.0 or as high as 32. These numbers represent the size of the hole that light travels through (there will be a marking on the body of the lens that tell you what aperture your lens is set to). Just to make things a little more complicated, the smaller the number, the bigger the hole. If you want to know why, once again refer to http://en.wikipedia.org/wiki/F-number ... but don't blame me if you get yourself confused ... a lot of that you really don't need to know.... For now, you just need to know the small number means big hole and big number means small hole. You might be able to see this in action.
Set the aperture to the smallest number and look through the lens ... it should just look like a hole though the glass. Now set it to the biggest number and you can see that hole has shrunk ...right?
If you can’t see it happening, don't worry, it’s not as easy to see through all lenses, just trust me it is happening!
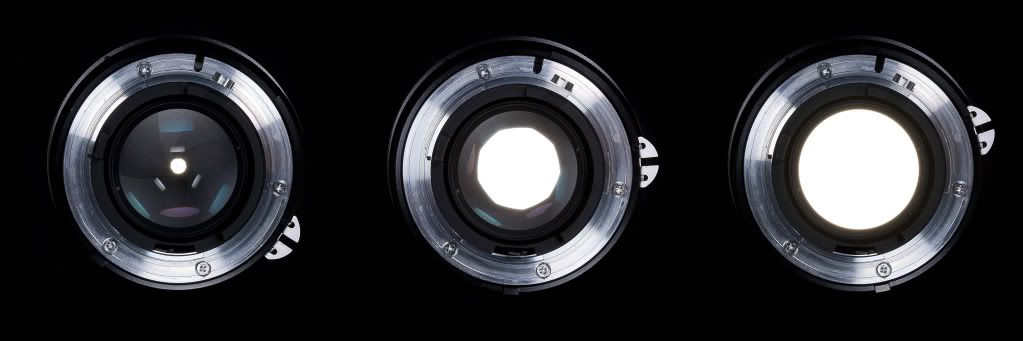
If you can see it, now try setting it to 8. You should now see the hole is somewhere between the smallest and biggest hole. Looking through the lens, try clicking from one extreme to the other - you should be able to see it getting bigger and smaller (that ring controls a mechanical iris made of a set of blades). If you have a more modern camera, you will just have to trust me that this is going on in your camera when you change the aperture (if you have a depth-of-field preview button though, you can see this effect by looking through your lens and holding the viewfinder to the light and then altering the aperture and holding down the preview button).
Here's what you should have seen (L/R: Fully closed, part open and fully open).
"But, how do I change the aperture without that ring?" I hear you shout! Well, to make things that little bit more confusing, different brands call the mode on the camera that allows you to change the aperture, different things. Look at the mode dial on your camera ... now be warned, we are going to have to move away from the comfort of auto now... but, don't worry I'm here to hold your hand (patronising git aren't I ). You will either have modes such as;
Auto, P, A, S, M, or
Auto, P, Av, Tv, M.
"Auto" is Auto
"P" is also basically Auto ... we will come back to that at a later date.
"A" or "Av" allows you to change the aperture to what you want it to be whilst the shutter speed stays automated.
"S" or "Tv" allow you to change the shutter speed to what you want it to be whilst the aperture stays automated.
"M" allows you to change both - scary stuff?
For now, ignore all of them apart from "A" or "Av". That is what I want you to set your camera to! This is known as "aperture priority" mode.
Now, somewhere on the camera, either under your thumb or forefinger when you grip it, there will be a control that when you rotate it the aperture number changes on the little screen on the camera / in your viewfinder - if you can’t find this control ...well, you are just going to have to get out the user manual! Rotate it and you will see it changing the number. As with our friends with their older cameras, the bigger the number, the smaller the hole etc.
So, now you can change the aperture - I don't wish too sound patronising here, but genuinely that is the first step to mastering your cameras’ controls: well done you!
But what do these numbers actually represent? We need a starting point. To make things simple we will start at 1.0. If you have a lens that has an aperture of 1.0 then you are lucky, it’s worth a whole hell of a lot of cash - good for you! But, that’s not really the point. Look at these numbers:
1.0, 1.1, 1.2, 1.4, 1.6, 1.8, 2, 2.2, 2.5, 2.8, 3.2, 3.5, 4, 4.5, 5.0, 5.6, 6.3, 7.1, 8, 9, 10, 11, 13, 14, 16, 18, 20, 22
As I said before, you will see that these numbers are represented either on your camera’s little screen or on the lens itself. We know the smaller numbers mean a bigger hole. We know a bigger hole means more light getting in. Something else you should know (and that I hinted at before) it that lenses that let more light in through a bigger hole are more expensive: this is because as a rule they are harder to manufacture and more desirable. A bigger hole lets in more light, so it is more useful when the amount of light where you are taking photos is limited.
Back to the numbers:
1.0, 1.1, 1.2, 1.4, 1.6, 1.8, 2, 2.2, 2.5, 2.8, 3.2, 3.5, 4, 4.5, 5.0, 5.6, 6.3, 7.1, 8, 9, 10, 11, 13, 14, 16, 18, 20, 22
As you can see, I have marked some of them in bold. Let’s concentrate on those for now!
Set your camera to 11. Knowing that a bigger number lets less light in now set it to 16. You have now halved the amount of light your lens will let into the camera compared to when it was set to 11. Knowing that a smaller number lets more light in, now set the camera to 8. You have now doubled the amount of light your lens will let into the camera compared to when it was set to 11. Clever eh?! Going from each of the numbers in bold to the next one up or down will double or halve the amount of light you are letting into the camera. This is known as adjusting exposure by one whole "stop" (a term derived from the days when they were actually physical plates with certain sized holes in instead of an iris diaphragm). The numbers in between will adjust the amount of light entering by a third of a stop. Of course the same applies if you go from 6.3 to 9; this halves the light. Going from 14 to 10 doubles the light. You should now know what these numbers represent even if you don't understand why they are such odd numbers. But, really you don't need to know why they are such strange numbers, just what they do!
If you have a digital camera and have been taking photos as you have been reading this you’re probably wondering why when you take a photo at 4 it’s not brighter than it was when you set it to 16. Well, that is because you have the camera set to "aperture priority". Aperture priority allows you to specify the aperture to what you like, but will adjust the shutter speed so you still have a correctly exposed photo!
So why would you want to adjust aperture apart from to let more or less light in? This is where having a digital SLR makes learning photography easier. If you don’t have one you are just going to have to trust me that this will happen! To make things easier go outside in daylight, or into a well-lit room, set the camera to 22, or whatever the smallest aperture (biggest number) the lens/camera will allow, set something on a table approximately 1 meter from you take a photo of it and look at the photo. Now set the camera to whatever the biggest aperture (smallest number) the lens/camera will allow and compare the two photos. You should see that the one that was taken at a small aperture has more in focus, from the foreground right into the background. Whereas, the one taken at the larger aperture will just have the object in focus and the background and foreground will be out of focus. You now know what altering the aperture does! It changes the amount of light going into the camera and controls the amount of the image that is in focus in front of and behind the subject! Think of the artistic possibilities of knowing that - you can take a photo of a person and make them the subject of the photo by knocking the background out of focus! You are now in control of the depth of field!!
Now you just need to know how to tell your friends about your new-found knowledge! You will remember that we looked at "f-numbers" on Wikipedia, well that’s what these numbers are called 4 is known as f/4, 2.8 is known as f/2.8. When we write them down we write them as f/4 or 1:4 as they represent a ratio
One last point of note regarding aperture is that all lenses are sharpest at certain apertures, usually around the f/5.6 - f/8 mark; although this only a rule of thumb. This can be worth taking into account when absolute image quality is the goal ... just don't forget about the effect on depth of field, especially when creative control is the overriding requirement!
And that, my photographer friends, is Aperture out of the way!
Have a play, experiment and see what you can achieve with aperture priority and depth of field!
Keep your eyes peeled on this site for the next installment where we shall be looking at Shutter Speed!
In the mean while good luck with you new found knowledge!
This tutorial was put together by Hamish Gill & Pete Askew, members of Real Photographers Forum.
We are happy for this to be published elsewhere as long as it is credited to us and the forum with this link:
http://www.realphotographersforum.c...Basics-Exposure-Part-1-Understanding-Aperture
Although the above demonstrates my point, it is actually fairly irrelevant to this article; it is merely to demonstrate to anyone, however knowledgeable about photography, that a lot of "advances" in modern cameras are actually counter-productive to learning how to use a camera properly.
I have decided to make it my goal to redress this balance by writing a few tutorials on how to use a camera properly that even a person picking up a single lens reflex camera (SLR) for the first time can understand.
A good analogy for what I am trying to do here would be learning to drive. Cars have lots of controls, modern cars have lots of controls that you don't need to use! But some of the controls are vital. Take the gear stick. It's very important to know what a gear stick does and when you use it. In most cars you won't get very far trying to pull away from a junction in 5th.... It's important to know, when learning to drive, that using 1st gear to pull away from the junction is a good idea! But do you need to know the gear ratios of your car? No, you need to know what they are and when to use them but not the intricate technical details of how they work. Now obviously you could just learn to drive an automatic car. But sit yourself in a manual car and try to drive and you're going to come unstuck. Do you think the best f1 or world rally champions only know how to drive an automatic car? Probably not! In my opinion, the same goes for photography; if you want to be good at it, and good at it consistently, you must first understand how to control a camera!
In this first tutorial we shall be looking at exposure!
Exposure
A camera, in its simplest form, is a box containing a material that is sensitive to light. If no light hits this material, the end result will be a black photograph. If too much light hits this material the end result will be a completely white photograph. The goal is to find a balance somewhere between these 2 extremes. These days this can be achieved by setting the camera to "auto" and pressing the button. If you are happy to do that then stop reading now! If, on the other hand, you would like to learn how to alter that amount of light to obtain the perfect image, you need to understand three things and the way that they interact:
Shutter Speed
Aperture
Sensitivity
We can divide these three things into two groups to help understand what they mean. The first group, for arguments sake, we shall call:
Mechanical: The shutter speed and aperture are both mechanical ways of changing the amount of light that enters the camera.
The second group (which isn't really a group as it just leaves sensitivity) we shall call:
Sensitivity: Essentially a photochemical process – with light either reducing a silver salt to silver metal (a latent image) in a film camera or creating a potential difference that results in an electrical signal in a digital camera. Sounds technical doesn't it? In simple terms it relates to literally how sensitive to light the material within the camera is. Various films and sensors differ in the amount you need to amplify their response to give you a visible image.... But we shall come back to that later!
Are you with me so far? Firstly, we shall look at the mechanical settings.
Aperture
I said before, by changing either the shutter speed or aperture we can vary the amount of light that enters the camera. We shall start with the aperture as it is the first barrier to the light as it enters the camera.... it’s also the most confusing; but get your head around the following and the rest will come easily ... you’re just going to have to trust me ... ok?
Referring to www.thefreedictionary.com we find the definition of Aperture as
ap·er·ture (pr-chr)
n.
1. An opening, such as a hole, gap, or slit.
2.
a. A usually adjustable opening in an optical instrument, such as a camera or telescope, that limits the amount of light passing through a lens or onto a mirror.
b. The diameter of such an opening, often expressed as an f-number.
c. The diameter of the objective of a telescope.
It is, as the definition says, a hole. In the case of photography it is a hole that can be varied in size. This variable sized hole is adjusted by a mechanical set of blades that create an iris diaphragm inside your lens. With a larger hole, more light can travel into the camera. With a smaller hole, less light can get in.
Easy! Well yes it is, but unfortunately there needs to be a way to represent the size of the hole to the user of the lens. And that's where it gets a bit more complicated! Refer, for a second, back to our dictionary definition and we can see that, “b. The diameter of such an opening, often expressed as an f-number. “ So what is an "f-number"? If you want the complicated answer then have a read of this:
http://en.wikipedia.org/wiki/F-number
... yeah ... told you it was complicated didn't I? Well, it doesn't have to be as complicated as all that!
Firstly I need you to pick up your camera! Over the years the way of adjusting aperture has become simpler, but gives less clues as to what is going on inside the camera. Lets first identify how you will be adjusting the aperture on your camera... we can look at what the effect of this is in a moment! Firstly remove the lens from your camera (if you have a body cap put it on the camera now so no dust can get inside). Put the camera to one side. Your lens will have either 1 or 2 rings (3 on some zoom lenses) that rotate around the body of the lens. One of them changes focus while the other changes the aperture. The focus one rotates smoothly whereas the aperture one will click as you rotate it. If you only have a focus control then don’t worry you just have a more modern camera/lens that allows the aperture to be adjusted with the camera.... I’ll get to that in a second... please read on even though the following doesn't directly relate to you... I will get to your type of camera/lens in a second
If you have an aperture control on your lens you are in luck because you will possibly be able to see the aperture physically changing as you rotate it’s control ring. Take the lens in one hand holding the body of the lens not the focus or zoom control. Hold it so you can see the numbers next to the aperture control: these numbers will probably range through 4, 5.6, 8 etc they might go as low as 1.0 or as high as 32. These numbers represent the size of the hole that light travels through (there will be a marking on the body of the lens that tell you what aperture your lens is set to). Just to make things a little more complicated, the smaller the number, the bigger the hole. If you want to know why, once again refer to http://en.wikipedia.org/wiki/F-number ... but don't blame me if you get yourself confused ... a lot of that you really don't need to know.... For now, you just need to know the small number means big hole and big number means small hole. You might be able to see this in action.
Set the aperture to the smallest number and look through the lens ... it should just look like a hole though the glass. Now set it to the biggest number and you can see that hole has shrunk ...right?
If you can’t see it happening, don't worry, it’s not as easy to see through all lenses, just trust me it is happening!
If you can see it, now try setting it to 8. You should now see the hole is somewhere between the smallest and biggest hole. Looking through the lens, try clicking from one extreme to the other - you should be able to see it getting bigger and smaller (that ring controls a mechanical iris made of a set of blades). If you have a more modern camera, you will just have to trust me that this is going on in your camera when you change the aperture (if you have a depth-of-field preview button though, you can see this effect by looking through your lens and holding the viewfinder to the light and then altering the aperture and holding down the preview button).
Here's what you should have seen (L/R: Fully closed, part open and fully open).
"But, how do I change the aperture without that ring?" I hear you shout! Well, to make things that little bit more confusing, different brands call the mode on the camera that allows you to change the aperture, different things. Look at the mode dial on your camera ... now be warned, we are going to have to move away from the comfort of auto now... but, don't worry I'm here to hold your hand (patronising git aren't I ). You will either have modes such as;
Auto, P, A, S, M, or
Auto, P, Av, Tv, M.
"Auto" is Auto
"P" is also basically Auto ... we will come back to that at a later date.
"A" or "Av" allows you to change the aperture to what you want it to be whilst the shutter speed stays automated.
"S" or "Tv" allow you to change the shutter speed to what you want it to be whilst the aperture stays automated.
"M" allows you to change both - scary stuff?
For now, ignore all of them apart from "A" or "Av". That is what I want you to set your camera to! This is known as "aperture priority" mode.
Now, somewhere on the camera, either under your thumb or forefinger when you grip it, there will be a control that when you rotate it the aperture number changes on the little screen on the camera / in your viewfinder - if you can’t find this control ...well, you are just going to have to get out the user manual! Rotate it and you will see it changing the number. As with our friends with their older cameras, the bigger the number, the smaller the hole etc.
So, now you can change the aperture - I don't wish too sound patronising here, but genuinely that is the first step to mastering your cameras’ controls: well done you!
But what do these numbers actually represent? We need a starting point. To make things simple we will start at 1.0. If you have a lens that has an aperture of 1.0 then you are lucky, it’s worth a whole hell of a lot of cash - good for you! But, that’s not really the point. Look at these numbers:
1.0, 1.1, 1.2, 1.4, 1.6, 1.8, 2, 2.2, 2.5, 2.8, 3.2, 3.5, 4, 4.5, 5.0, 5.6, 6.3, 7.1, 8, 9, 10, 11, 13, 14, 16, 18, 20, 22
As I said before, you will see that these numbers are represented either on your camera’s little screen or on the lens itself. We know the smaller numbers mean a bigger hole. We know a bigger hole means more light getting in. Something else you should know (and that I hinted at before) it that lenses that let more light in through a bigger hole are more expensive: this is because as a rule they are harder to manufacture and more desirable. A bigger hole lets in more light, so it is more useful when the amount of light where you are taking photos is limited.
Back to the numbers:
1.0, 1.1, 1.2, 1.4, 1.6, 1.8, 2, 2.2, 2.5, 2.8, 3.2, 3.5, 4, 4.5, 5.0, 5.6, 6.3, 7.1, 8, 9, 10, 11, 13, 14, 16, 18, 20, 22
As you can see, I have marked some of them in bold. Let’s concentrate on those for now!
Set your camera to 11. Knowing that a bigger number lets less light in now set it to 16. You have now halved the amount of light your lens will let into the camera compared to when it was set to 11. Knowing that a smaller number lets more light in, now set the camera to 8. You have now doubled the amount of light your lens will let into the camera compared to when it was set to 11. Clever eh?! Going from each of the numbers in bold to the next one up or down will double or halve the amount of light you are letting into the camera. This is known as adjusting exposure by one whole "stop" (a term derived from the days when they were actually physical plates with certain sized holes in instead of an iris diaphragm). The numbers in between will adjust the amount of light entering by a third of a stop. Of course the same applies if you go from 6.3 to 9; this halves the light. Going from 14 to 10 doubles the light. You should now know what these numbers represent even if you don't understand why they are such odd numbers. But, really you don't need to know why they are such strange numbers, just what they do!
If you have a digital camera and have been taking photos as you have been reading this you’re probably wondering why when you take a photo at 4 it’s not brighter than it was when you set it to 16. Well, that is because you have the camera set to "aperture priority". Aperture priority allows you to specify the aperture to what you like, but will adjust the shutter speed so you still have a correctly exposed photo!
So why would you want to adjust aperture apart from to let more or less light in? This is where having a digital SLR makes learning photography easier. If you don’t have one you are just going to have to trust me that this will happen! To make things easier go outside in daylight, or into a well-lit room, set the camera to 22, or whatever the smallest aperture (biggest number) the lens/camera will allow, set something on a table approximately 1 meter from you take a photo of it and look at the photo. Now set the camera to whatever the biggest aperture (smallest number) the lens/camera will allow and compare the two photos. You should see that the one that was taken at a small aperture has more in focus, from the foreground right into the background. Whereas, the one taken at the larger aperture will just have the object in focus and the background and foreground will be out of focus. You now know what altering the aperture does! It changes the amount of light going into the camera and controls the amount of the image that is in focus in front of and behind the subject! Think of the artistic possibilities of knowing that - you can take a photo of a person and make them the subject of the photo by knocking the background out of focus! You are now in control of the depth of field!!
Now you just need to know how to tell your friends about your new-found knowledge! You will remember that we looked at "f-numbers" on Wikipedia, well that’s what these numbers are called 4 is known as f/4, 2.8 is known as f/2.8. When we write them down we write them as f/4 or 1:4 as they represent a ratio
One last point of note regarding aperture is that all lenses are sharpest at certain apertures, usually around the f/5.6 - f/8 mark; although this only a rule of thumb. This can be worth taking into account when absolute image quality is the goal ... just don't forget about the effect on depth of field, especially when creative control is the overriding requirement!
And that, my photographer friends, is Aperture out of the way!
Have a play, experiment and see what you can achieve with aperture priority and depth of field!
Keep your eyes peeled on this site for the next installment where we shall be looking at Shutter Speed!
In the mean while good luck with you new found knowledge!
This tutorial was put together by Hamish Gill & Pete Askew, members of Real Photographers Forum.
We are happy for this to be published elsewhere as long as it is credited to us and the forum with this link:
http://www.realphotographersforum.c...Basics-Exposure-Part-1-Understanding-Aperture
Last edited by a moderator:
") ... Just don't loose the shot!
... Just don't loose the shot!