Critique Welcomed DIY LF camera build

David Mitchell

Well-Known Member
Hi all,

I thought that I would start a thread about my LF camera build, I have the other thread about the DIY optics so this thread will only be about the camera build.

Here are the criteria that I am wanting to fulfil:

  • 4x5 LF camera
  • Can use DDS
  • Useful for a range of lenses
  • Cheap
  • Easy to make
  • No specalist parts
  • Portable


I was initially thinking about making a sliding box camera which I do like the idea of as the lens is fixed and you move the film back and forth.

images


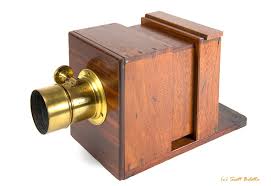
I was thinking about making one of those using some foam core stuff that you use on mounting photos etc with some edige reinforcement. The issue being is that its not very portable but I might still make one.

I did like this idea as its much like the pinwide/travelwide camera which is basically just like a Titan pinhole camera. I am trying to keep it simple in the fact that I need to have varible focal distances but also able to focus the lens as well.

My DIY lens will probably just be a barrel lens, which is fine as the paper negative is slow lol. I have decided that it might be easier to have a camera like the monorail cameras with front and rear standards and bellows which would allow for adjustments for focal length and lens focus.

The issue with the monorail camera is that its not amazingly portable and could perhaps be slightly unsteady if put outside.

I have therefore come up with this compact design which will basically flat pack:


The camera has a rail at the bottom and the sides (but not the top) - this will allow the front standard to move forward and back to focus the lens and adapt for different focal lengths.

The struts will be attached to each of the standards with the use of simple brackets with locking nuts on, the rear standard backets will also swivel.

If I pushed both standards together the struts would stick out each side meaning that its not as compact, to get round this I have figured out that what you can do is unlock the strut from the front standard, pull the strut in towards the rear standad (and out of the bracket at the front) and then swivel it so that its flat with the rear standard.

There will be 1 side without a strut so that the DDS has clearance to be put in and out, for portrait the gap will be at the top, for landscape the gap will be at the side.

The DDS is held on the rear via some rubber bands looped around some small pins in the rear standard.

The DDS will be interchangable with a ground glass screen for viewing and setting up - once everything is setup and the struts are locked then the DDS is put in its place.
 
I have just got some 10mm foam board I am going to use as lens board, the front and rear standards have just been made (just setting and one has been stained etc). I will post some photos up tomorrow with the completed standards I will be using, I am just working out what I will be doing with the bellows as I will be looking to shoot between 70mm and 150mm, with both standards together the film to lens distance is around 70mm so I might make a recessed lens board for the wider lens.
 
Thanks Pete, thats a ULF camera lol :D I did check out how to make bellows and it seems fairly complex with a lot of cutting involed, also when I want to use the 70mm lens the 2 standards will be basically pushed together so I am thinking of attaching something on the ouside of the standards rather than inside.

I am even thinking of something like a light proof bag attached for each standard which can simply be 'puffed out' away from the centre of the camera.

I am just looking into a few options :)
 
Maybe then it would be worth looking for a bag bellows on ebay. They are used in place of standard bellows when using wide angle lenses so that they don't restrict movements when the standards close together.

Bag bellows 5x4 Sinar Fit | eBay

Thanks for that Pete, I was thinking of using a bag as bellows, but didn't actually know that product actually exsisted lol :D I just need around 100mm of movement back and forth to get between a 70mm lens and around 160ish. Is there anything inside those bag bellows that ensure that it doesn't crumple up inwards?

The standards I have made have a fair bit of space down each side specifically so I can attach hardware to it - eg the bellows onto the side rather than the front edge.

I would also probably be using a recessed lens board for the wider lens due to the film plane to edge of the front standard being 70mm when the 2 standards are together.

I will take some photos tomorrow of what I have done so far, I have also been informed of a 'macro slider' which is a rail system for macro setups but without inbuilt macro bellows. It has a tripod socket and screw threads for the the camera/standard, but I could use it to screw into the standards:

macro-rail-slider.jpg


I guess to make that work I would need to recess a nut of some sort into the base of each standard which should hold everything steady instead of using DIY struts. I am still deciding on this as I want my camera to be as DIY as possible much like your camera.
 
Are we going to see some developed photos from this David? That would be marvellous.
Considering you were new to photog only 12months ago, you've come pretty far to build a camera!!
Fair play!
 
Last edited:
Are we going to see some developed photos from this David? That would be marvellous.
Considering you were new to photog only 12months ago, you've come pretty far to build a camera!!
Fair play!

I will be, just need to get the chemicals and a safe light, will be doing try development (much like I do with cyanotypes) although timing on those are less critical vs silver based photography. The reason I havn't shot the speed graphic of any large format camera so far is the cost of the film and the development. The paper negative (or positive) is much cheaper and its easier for me to buy the photographic paper than to mix up silver based solution to hand coat paper.

I camera is just a light tight box with a lens at one end and recording medium at the other lol its easier to build LF or ULF cameras vs smaller cameras as everything can be oversized lol.

I need to finish off my lens first, shouldn't take long though and should give the desired image, Tintype photography was what got me interested in all this, and it looks like a paper postive (rather than a negative) is the cheaper (and less poisonous equivilent) lol.

I will take some photos of how far I have got later - if I can make a camera anyone else can, I have very limited tools and materials.
 
The bag bellows are designed not to collapse and are usually made of thick rubberised textile. The Sinar ones (and Cambo etc) have a rim bonded to each end that engages in the standards and locks in place. The surface is flat and so you could bond it to your home-made standards with RTV silicone or similar. Even Gaffa tape would probably be strong enough.

The macros sliders would work but I think you'll be fine just sliding the standards. Having built a fine focus mechanism for mine I now realise how easy it was to focus before! [doh]. Also, don't forget that you can leave all the movement to just one standard and keep the other fixed. Using a bag bellows and have standards with a flat back, you may not need to use a recessed panel.

Looking forward to seeing how far you've got and what the Mk 1 looks like. :)
 
I have taken some photos of the mark 1 and fairly happy with it, everything fits ok together, although I will probably add a small bit of rubber around in front of the lens board and film holder so ensure everything is light tight. Being home-made and 'british shed' precision (unlike German precision :P) there are a few bits here and there that need to be sorted, not really an issue as there is a board around the edge of the film holder.

With regards to the ground glass, I have got some 10mm foam core board and have madea lens board and also a ground glass insert which will go in place of the DDS. The flange distance on the DDS is 5mm so what I will do with the ground glass insert is to attach some baking paper (the clearish white sort or tracing paper) onto the insert, then add on some 5mm foam core board ontop around the edges to space it off.

I will get some photos of the progress so far on it later, its getting there and there aren't many things left to sort lol I will order a 200mm macro slider and look at getting some captive nuts added to the base of each standard. I will then work on what I need to do for the bellows, perhaps I could have some bag bellows for wide angle and some folding bellows for longer focal distances?

Here is an idea:

Tube of black out fabric
Elasticate each edge
Add a small lip to each standard
Attach the bag bellows with the lip on each standard

I will have a think about the bellows, I could just use black out fabric and attach splints inside on the 4 sides to keep it open but still allow it to move.

Hmmm need to have a think on the bellow setup.
 
Just had a thought, I am currently thinking about mounting the lens as they are normally mounted to the lens board with the lens (being thin) mounted on the front of the board. This means that the focal distance is from the rear element to the film plane which is probably around 70mm (need to go and measure again).

As my lenses will barrel lenses it might be an idea to have the lens half and half in the standard lens board position - this might mean that the rear element of the lens starts say 30mm back from the lens board meaning that the lens board would need to be 100mm away and not 70mm.

It will mean that I could just use standard bellows but have the wider lenses (if 2 element barrel lenses) to be mounted slightly deeper into the lens board. I was thinking about using velcro or something to have a change of bellows depending on the lens being used.

It would mean that I could mount the normal 150mm F/L lenses to the front of the board and simply move the wider lenses slightly inside.
 
Seems a reasonable plan.

I have now ordered a 200mm movement macro slider to attach the standards to so that will arrive soon, I will check the distance between film plane and back of the lens board to see if I do need to run a recessed board or if I can sort it so that I can run the rear element of the lens inside the camera.

I have just ordered a set of close up filters of a much larger size for the actual wide angle lens build, they will be stacked to give me 14 dioptres. I will see what its like on the speed graphic when they arrive although might be able to make some bellows in the time it takes for them to arrive.

Anyhow, lens updates will be on the other thread lol
 
Here are some photos of the build so far, I will be tidying up parts (they look slightly rough initially but ive sanded parts back and waxed them again).

Front and rear standard (front on the right, rear on the left)


There are some stops on the front standard 10mm in so that the lens board made from 10mm thick foam core fits flush.


Rear standard (back of the camera facing towards) there is a cut away for the DDS to fit in


The bottom of the DDS sits against these pins


DDS held in place with bands against cutout and pins


DDS fits flush


DDS against pins to keep film plane flat


Front and rear showing what the camera will look like without bellows - the 10mm foam core lens board is fitted flush due to the shelves in the front standard


This is the 'ground glass', this is fitted for focus in place of DDS and then slides out to put in the DDS, will have baking paper fitted on one side then spaced off 5mm as per specs on DDS for correct focus.


Progress so far


Sanded the standards and rewaxed a bit, smoothed the edges down and now looks much more presentable


I will be putting a small strip of draft excluder around the edge of the front and rear standards internally to ensure a light tight seal.

Next on the list is the bellow arrangement and cutting the hole for the lens etc I also need some 5mm foam core for the spacers on the ground glass, the interior of the camera will be sprayed black when everything is together.
 
Last edited:
Looking good David. So you intend to use greaseproof paper for the screen? I'm sure that will work OK but it is also very simple to make a glass screen with some scraps of picture-frame glass and valve grinding paste. It takes about 10-15 minutes and is much brighter and easier to focus with than paper. Have a look at the bit my build report.
 
Looking good David. So you intend to use greaseproof paper for the screen? I'm sure that will work OK but it is also very simple to make a glass screen with some scraps of picture-frame glass and valve grinding paste. It takes about 10-15 minutes and is much brighter and easier to focus with than paper. Have a look at the bit my build report.

Duely noted down, I am keeping the build as simple as possible, I just remember back in school when we made a camera obscura and used tracing paper as the view screen and basically made a small sliding box pinhole camera come to think of it lol

I just need to take into account the extra thickness of the glass but I have valve grinding paste so thats not an issue to get sorted although would need something to cut the glass with - will see what I have to hand.

So far this camera has cost me around £2 to make so far lol
 
Slight update on this, I have remade the front standard to fit the bellows I now have and its all together, just glued in some tripod socket friendly nuts into the wood and waiting for them to cure overnight.

The bellows are screws to the front standard but can be removed from the rear standard meaning that I can fit a different front standard to it if needed. I am tempted to try and do a fixed focus camera but will see how this turns out to start with :)

Still need to sort out the shutter though, unless the exposure time for paper negatives is slow enough to not worry?
 
No photos yet, its round my parents at the moment (they have the garage and the tools I am using lol) ah ok, that should be fine then, the lens will be stopped down a bit so it will be fine hopefully.
 
Back
Top