Pete Askew
Admin
As promised in the thread on the https://realphotographersforum.com/threads/cambo-legend-5x4.9251/, here is a first illustration on using a large format camera, in this case for macro photography. The subject in this instance was a large tropical seedpod with an interesting surface pattern. The first two shots show the setup:
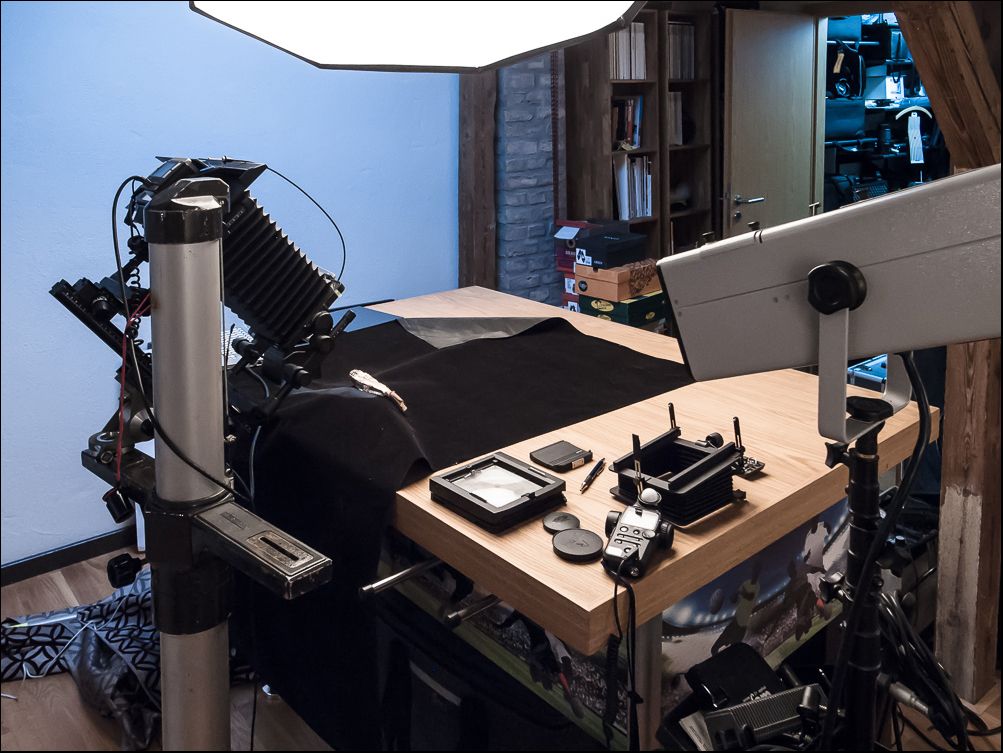

As you can see, the subject is positioned on a black, velvet cloth about 15 cm in front of the lens. The camera is positioned on a stand at 90º to the surface of the seedpod. A bellows extension of 36 cm has been employed with no movements applied. The subject is lit by a large softbox overhead and slightly angled from the left and by a focusing spotlight angled at about 15º from the subject from the right. The power ratio employed was 3:1, spot : softbox. I would not normally use a softbox for this but a second angled source to avoid specular reflections but this worked better for this demonstration.
The first job is to compose and focus the subject using the ground glass screen and a focusing loupe. To do this the lens must be opened using the lever on the lens (see the shooting sequence further down). Note that in this example I am shooting onto a digital back mounted on a sliding adapter (PhaseOne Light Phase Adapter). The left side of this is equipped with a focusing screen and the right holds the back. Once you have focussed you slide the back into the position previously occupied by the screen. The sensor measures 5cm x 4cm and so the magnification ratio is about 1.7:1.
Having composed your shot you need to meter for lighting. In this example the flash units (powered off of a Bowens Quadmatic Asymmetric 3K generator) indicate an aperture of f1:38 at ISO 50. However, we have 36cm of extension and so must calculate the impact of this on the exposure (see also http://www.realphotographersforum.c...chnical-imaging-effect-bellows-extension.html). This is done using the formula Log10(E^2/F^2)/Log10(2), where E = extension in mm and F = focal length of the lens in mm. In this example we need to compensate by 3.4 f-stops which gives us an aperture setting of f1:11.
Now we are ready to dial in the settings and take the shot.
The first step is to close the lens.

Prime the shutter.

Then set the aperture (I had already set the shutter speed to 1/60s - simply a convenient speed).

Now we can slide the back from the viewing position:

to the taking position (the back now occupies the same position as the screen and in the exact focal distance (it is parfocal).

As we are using a PhaseOne P45 back (39MP 5x4 cm sensor) the first thing to do is to use a pre-trigger to wake up the circuitry (this drops in to sleep mode immediately after a shot to minimise noise generated by heat on the circuits - when you are using the back on a camera - this one is a Hasselblad H mount version - the camera will 'wake' the back a millisecond or so before the shot: there is no electrical connection to do this on a LF setup such as this). A special cable connecting the flash sync socket on the lens, equipped with a 'wake-up' button does this - note that the flash sync cable is connect the the back which triggers capture and the back is connected to the flash generator to fire the flash heads.

You now have a few seconds to release the shutter while the back is still awake.

The flash will then fire and the shot taken. In this example we are shooting tethered and so the file is transferred to CaptureOne Pro.

After processing the raw file this is the result. Note the specular highlights that have resulted from the overhead lighting. This image represents a 3cm section of the seedpod and has a few mm depth of field.

All images taken with a Ricoh GR Digital III except for the final image which was shot as described above. PP was in LR except for the the final image which had minimal processing applied in CaptureOne Pro and a border added in PS via LR.
As you can see, the subject is positioned on a black, velvet cloth about 15 cm in front of the lens. The camera is positioned on a stand at 90º to the surface of the seedpod. A bellows extension of 36 cm has been employed with no movements applied. The subject is lit by a large softbox overhead and slightly angled from the left and by a focusing spotlight angled at about 15º from the subject from the right. The power ratio employed was 3:1, spot : softbox. I would not normally use a softbox for this but a second angled source to avoid specular reflections but this worked better for this demonstration.
The first job is to compose and focus the subject using the ground glass screen and a focusing loupe. To do this the lens must be opened using the lever on the lens (see the shooting sequence further down). Note that in this example I am shooting onto a digital back mounted on a sliding adapter (PhaseOne Light Phase Adapter). The left side of this is equipped with a focusing screen and the right holds the back. Once you have focussed you slide the back into the position previously occupied by the screen. The sensor measures 5cm x 4cm and so the magnification ratio is about 1.7:1.
Having composed your shot you need to meter for lighting. In this example the flash units (powered off of a Bowens Quadmatic Asymmetric 3K generator) indicate an aperture of f1:38 at ISO 50. However, we have 36cm of extension and so must calculate the impact of this on the exposure (see also http://www.realphotographersforum.c...chnical-imaging-effect-bellows-extension.html). This is done using the formula Log10(E^2/F^2)/Log10(2), where E = extension in mm and F = focal length of the lens in mm. In this example we need to compensate by 3.4 f-stops which gives us an aperture setting of f1:11.
Now we are ready to dial in the settings and take the shot.
The first step is to close the lens.
Prime the shutter.
Then set the aperture (I had already set the shutter speed to 1/60s - simply a convenient speed).
Now we can slide the back from the viewing position:
to the taking position (the back now occupies the same position as the screen and in the exact focal distance (it is parfocal).
As we are using a PhaseOne P45 back (39MP 5x4 cm sensor) the first thing to do is to use a pre-trigger to wake up the circuitry (this drops in to sleep mode immediately after a shot to minimise noise generated by heat on the circuits - when you are using the back on a camera - this one is a Hasselblad H mount version - the camera will 'wake' the back a millisecond or so before the shot: there is no electrical connection to do this on a LF setup such as this). A special cable connecting the flash sync socket on the lens, equipped with a 'wake-up' button does this - note that the flash sync cable is connect the the back which triggers capture and the back is connected to the flash generator to fire the flash heads.
You now have a few seconds to release the shutter while the back is still awake.
The flash will then fire and the shot taken. In this example we are shooting tethered and so the file is transferred to CaptureOne Pro.
After processing the raw file this is the result. Note the specular highlights that have resulted from the overhead lighting. This image represents a 3cm section of the seedpod and has a few mm depth of field.
All images taken with a Ricoh GR Digital III except for the final image which was shot as described above. PP was in LR except for the the final image which had minimal processing applied in CaptureOne Pro and a border added in PS via LR.
Last edited:
 there is no way I could ever afford that P45 back - how big is that RAW file from the back btw?
")
")
