Thomas brookes
RPF Chief iPhone app Reviewer
Hello every one.
Egged on by the new D.I.Y challenge here on RPF I decided to make a pinhole lens for my DSLR. The idea of how I would achieve this came to me a while back but I never really got around to doing it. Here is a brief run down of what I did and results along with some handy links to help you along your way if you fancy having a go.
The idea:
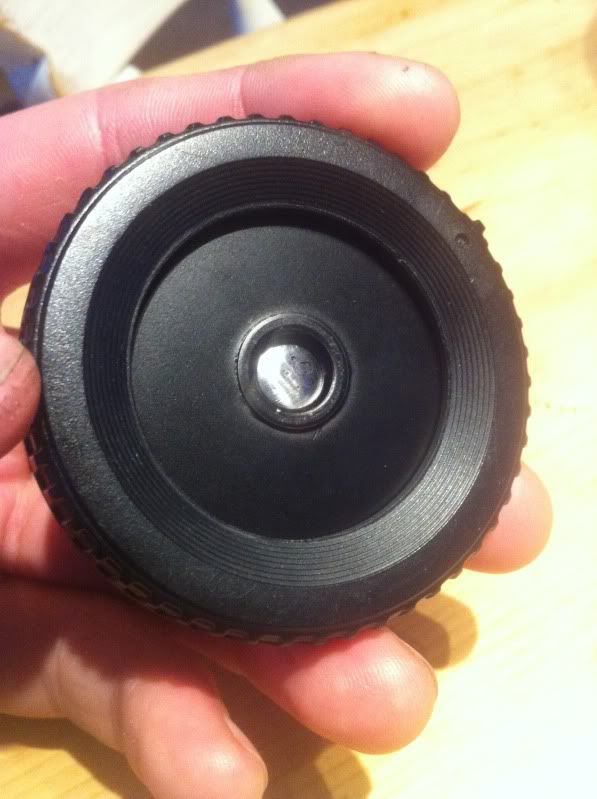
The idea was to simply use the camera's body cap as the surround as its design fits perfectly on the camera itself and is “light tight”. Then somehow I would put a pin hole in it. After looking online I found many people had had the same idea. By simply drilling a 10mm hole in the centre front of the body cap, putting a pinhole in some shim/tin/foil and taping it on the inside of the cap. Hey presto job done. Unfortunately by my own admission I have the tendency to completely over engineer things. Not because im pedantic and annoying, purely for the challenge. Whilst some people would be happy drilling a 10mm hole through the centre of the cap my gripe was that most manufacturers have their name written across the middle of it giving you a NI( 10mmhole )ON. For me it looked hideous and half a job . As I was making it I wanted it to be a reflection of my workmanship as well as sturdy,good looking and functional.
The build:
So I was going to do away with the manufacturers logo completely. In my case Nikon. Luckily for me the flat bit in the middle with Nikon written on it was slightly smaller than the plastic ring/bore on the other side. I put it on the lathe at work and machined the flat bit out completely leaving a ring with a 2mm step on the inside face.
I then got a 2mm thick piece of aluminium plate and cut and filed to size so it would have a nice interference(tight) fit to the ring/bore. I then drilled a 10mm hole with a nice hefty countersink on it. When pushed in place it located on the 2mm step holding it perfectly in place.

I then cut discs out of .04mm shim exactly the same size as the ring/bore. I cut lots of shim discs out as I knew it would be a case of trial and error. To secure the shim in place I made a rubber O-ring that fitted tightly to the inside of the bore as I placed the shim against the aluminium plate the O-ring would be pushed against the back of the shim securing it and also adding a better light seal.


The pin hole:
there is an optimum size pinhole for any focal distance. To find this I first needed to determine the distance between the sensor and the pinhole. This distance has many names but I now know it as flange back distance (FBD) this is the distance from the mounting ring to the sensor and varies on model and manufacturer this wikipedia page tells you more about it but more importantly has a pretty extensive list of manufacturers and there mounts (FBD).
Flange focal distance - Wikipedia, the free encyclopedia
My Nikon f-mount has an FBD of 46.50mm
I then measured on the cap from where It sits on the mount to the pin hole which came out at 2mm
giving me a grand total of 48.5mm
so how does this equate to pinhole size? I'm not going to explain this as it is quite complex but this wikipedia page will tell you how to work that out as it frazzled my brain for a while.
Pinhole camera - Wikipedia, the free encyclopedia
The most important thing to stress at this point is you will never be able to realistically produce that size hole accurate to .01 of a mm with a pin. This bit is all trial and error.
If you work on the basis that the optimal pinhole for a 50mm focal length pinhole is between 0.2mm and 0.3mm in diameter you can obtain a ball park pin hole size. I made about 6 varying between .02mm to .04mm and tested each one.
Its also worth pointing out that as you push the pin through you create a very small cone shaped hole instead of a flat straight through hole, this will change things a little. Photo etched pinhole brass shims are available to buy but for me this was a DIY lens and the pinhole is the business end so I wanted to do it myself.
After punching the hole I sanded each side with “wet and dry” sand/emery paper or very very fine sand/emery paper. To get rid of as much of the cone shape as possible.
Trial and error:
I then sat for about 4 hours testing different shims and different shutter speeds trying to find the one that was the sharpest. This took so long because some of the really small pinholes I had made had to have a 20 minuet exposure plus the time my camera took to process that afterwards... be patient is all I can say. In some shots I had quite a prominent glare in the shape of a crescent across the top of the image assuming it was the counter sinks shiny frontage I sprayed the metal matte black.wich seemed to solve the problem. Whilst trialing my pinholes I noticed that the field of view of the image was tiny... this got me thinking.
I had purchased a lens for my iphone a while back and did a review on here. I played around with it and found that it created much the same effect on the pinhole as it did on the iphone allowing me to get wide angle shots or macro shots. I admit I don't know why but it did and as far as I was concerned that was awesome! Being as the iphone lens attached with a magnet the aluminium obviously wouldn't hold it in place so I used the spare sticky back ring around the 10mm hole.
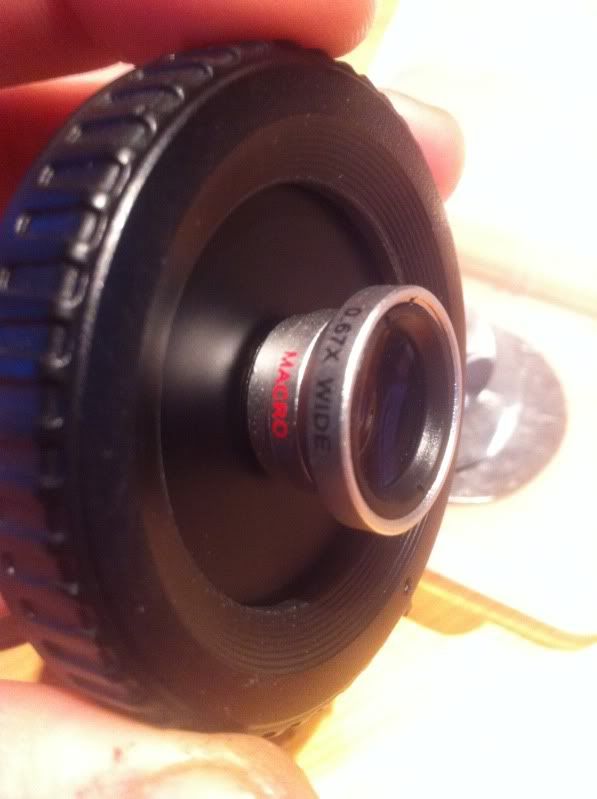
in some shots I had quite a prominent glare in the shape of a crescent across the top of the image assuming it was the counter sinks shiny frontage I sprayed the metal matte black.wich seemed to solve the problem.
The results:
Trial and error still continues. Below are some of the first shots from my first real outing. As it was a
bright day I dropped the ISO to 100 and concentrated on my shutter speeds ranging from 8second exposures in the sun light to 20 seconds in dark areas.
Enjoy.


im pretty pleased with the results what do you think? this was my first attempt and i cant wait to take it out again.
watch this space
thank you for looking
Egged on by the new D.I.Y challenge here on RPF I decided to make a pinhole lens for my DSLR. The idea of how I would achieve this came to me a while back but I never really got around to doing it. Here is a brief run down of what I did and results along with some handy links to help you along your way if you fancy having a go.
The idea:
The idea was to simply use the camera's body cap as the surround as its design fits perfectly on the camera itself and is “light tight”. Then somehow I would put a pin hole in it. After looking online I found many people had had the same idea. By simply drilling a 10mm hole in the centre front of the body cap, putting a pinhole in some shim/tin/foil and taping it on the inside of the cap. Hey presto job done. Unfortunately by my own admission I have the tendency to completely over engineer things. Not because im pedantic and annoying, purely for the challenge. Whilst some people would be happy drilling a 10mm hole through the centre of the cap my gripe was that most manufacturers have their name written across the middle of it giving you a NI( 10mmhole )ON. For me it looked hideous and half a job . As I was making it I wanted it to be a reflection of my workmanship as well as sturdy,good looking and functional.
The build:
So I was going to do away with the manufacturers logo completely. In my case Nikon. Luckily for me the flat bit in the middle with Nikon written on it was slightly smaller than the plastic ring/bore on the other side. I put it on the lathe at work and machined the flat bit out completely leaving a ring with a 2mm step on the inside face.
I then got a 2mm thick piece of aluminium plate and cut and filed to size so it would have a nice interference(tight) fit to the ring/bore. I then drilled a 10mm hole with a nice hefty countersink on it. When pushed in place it located on the 2mm step holding it perfectly in place.
I then cut discs out of .04mm shim exactly the same size as the ring/bore. I cut lots of shim discs out as I knew it would be a case of trial and error. To secure the shim in place I made a rubber O-ring that fitted tightly to the inside of the bore as I placed the shim against the aluminium plate the O-ring would be pushed against the back of the shim securing it and also adding a better light seal.
The pin hole:
there is an optimum size pinhole for any focal distance. To find this I first needed to determine the distance between the sensor and the pinhole. This distance has many names but I now know it as flange back distance (FBD) this is the distance from the mounting ring to the sensor and varies on model and manufacturer this wikipedia page tells you more about it but more importantly has a pretty extensive list of manufacturers and there mounts (FBD).
Flange focal distance - Wikipedia, the free encyclopedia
My Nikon f-mount has an FBD of 46.50mm
I then measured on the cap from where It sits on the mount to the pin hole which came out at 2mm
giving me a grand total of 48.5mm
so how does this equate to pinhole size? I'm not going to explain this as it is quite complex but this wikipedia page will tell you how to work that out as it frazzled my brain for a while.
Pinhole camera - Wikipedia, the free encyclopedia
The most important thing to stress at this point is you will never be able to realistically produce that size hole accurate to .01 of a mm with a pin. This bit is all trial and error.
If you work on the basis that the optimal pinhole for a 50mm focal length pinhole is between 0.2mm and 0.3mm in diameter you can obtain a ball park pin hole size. I made about 6 varying between .02mm to .04mm and tested each one.
Its also worth pointing out that as you push the pin through you create a very small cone shaped hole instead of a flat straight through hole, this will change things a little. Photo etched pinhole brass shims are available to buy but for me this was a DIY lens and the pinhole is the business end so I wanted to do it myself.
After punching the hole I sanded each side with “wet and dry” sand/emery paper or very very fine sand/emery paper. To get rid of as much of the cone shape as possible.
Trial and error:
I then sat for about 4 hours testing different shims and different shutter speeds trying to find the one that was the sharpest. This took so long because some of the really small pinholes I had made had to have a 20 minuet exposure plus the time my camera took to process that afterwards... be patient is all I can say. In some shots I had quite a prominent glare in the shape of a crescent across the top of the image assuming it was the counter sinks shiny frontage I sprayed the metal matte black.wich seemed to solve the problem. Whilst trialing my pinholes I noticed that the field of view of the image was tiny... this got me thinking.
I had purchased a lens for my iphone a while back and did a review on here. I played around with it and found that it created much the same effect on the pinhole as it did on the iphone allowing me to get wide angle shots or macro shots. I admit I don't know why but it did and as far as I was concerned that was awesome! Being as the iphone lens attached with a magnet the aluminium obviously wouldn't hold it in place so I used the spare sticky back ring around the 10mm hole.
in some shots I had quite a prominent glare in the shape of a crescent across the top of the image assuming it was the counter sinks shiny frontage I sprayed the metal matte black.wich seemed to solve the problem.
The results:
Trial and error still continues. Below are some of the first shots from my first real outing. As it was a
bright day I dropped the ISO to 100 and concentrated on my shutter speeds ranging from 8second exposures in the sun light to 20 seconds in dark areas.
Enjoy.
im pretty pleased with the results what do you think? this was my first attempt and i cant wait to take it out again.
watch this space
thank you for looking
Last edited by a moderator:
")

 )
)")