Darren Bradley
Well-Known Member
As I mentioned earlier, the first rule in architectural photography is to accurately depict the structure of the building - relatively free of distortions from the camera.

A lot of photographers have no interest in architectural photography because it's perceived as being too dry and documentary, with not enough opportunity as a creative outlet. Even many of you have commented that you never really gave much consideration to architectural photography before, and that's probably why. And frankly, you're mostly right. I'm not even religious and I still thank God every day that I don't have to go out and shoot anonymous rows of cubicles in some corporate headquarters to pay my rent like the poor guy who had to shoot this photo, here...

But it's not all about corporate office buildings and generic model homes, as I've hopefully demonstrated. There are a lot of very interesting buildings out there that are a lot of fun to photograph and hopefully to see and experience. And it is possible to follow the rules and still come up with images that are visually captivating for the general public, or at least other photographers. And part of the challenge is to find the interesting details and the features of a building that give it soul and character, and to emphasize those in a way that the photograph is able to impart at least some of the feeling of being there. But more on that in a later section. For now, let's talk about the rules and some basic techniques...
The rule about accurate depiction means that most photos of our built environment (houses, office buildings, etc.) that you see aren't "architectural photography" in the proper sense. For most people - including photographers - buildings are just meant to serve as a backdrop for their subject, so little attention is paid to whether the building is crooked. Even with the building is the main subject, it generally appears keystoned, which means that it looks like the walls are collapsing inward.
Here's an example of a keystoned building.

Keystoning
Our brains automatically correct what our eyes see without us realizing it so that in real life, we do always correct for perspective so buildings always appear to be standing up straight. The only exception to this is when we're standing directly under a tall building, you will still see that keystone effect - even with our own eyes.
However, cameras don't have the same brains we do (yet), so they don't make those corrections automatically. That means that if we tilt the camera upwards even slightly, it will cause the building to keystone. In architectural photography, we use techniques and/or specialized equipment to correct for that.
I already mentioned tilt-shift lenses. They are really essential for this sort of photography because they provide a means to correct for keystoning while taking the picture. This is much preferred to correcting the photo in PP, because it will distort the subject less, and will mean you will not have to crop and lose part of the frame.
Here's a photo of a subject taken with a regular wide-angle lens. Note that I needed to tilt the camera upwards to get the whole building in, and that lead to keystoning.

And here's a photo of the same building, taken with a tilt-shift lens. to take this shot, I held the camera directly level and perpendicular to the ground. This meant that the top of the building was cut off and I had a lot of street. So I shifted the lens upwards while keeping the camera level (i.e. not tilting it upwards), and the top of the building came into view.

Yes, it IS OK in architectural photography to depict a building as keystoned from time to time.

In fact, it's unavoidable on some of the taller buildings, depending on your angle. But if you're going to do it, exaggerate it a lot so that it appears intentional. Either go big or go home. If the building is only slightly tilted, it just appears you weren't paying attention or didn't know any better.

This is probably the single most important thing that distinguishes architectural photography from other types. It may seem like a small thing, and most people don't necessarily even notice. But in my experience, people do see it without realizing it. And people will generally prefer a photo that shows true perspectives without understanding why. They won't be able to tell you WHY they prefer it, but they will say they do.
So how do you achieve that if you don't have a TS lens? Well, I already talked about PP. But really, the easiest way to do it is to just make sure you're holding your camera straight and level. I have taken architectural photography shots with a standard 50mm prime on my DSLR...

Or a standard wide angle...

...or any other kind of lens just using this simple technique. The above shots were NOT perspective-corrected in PP in any way. I just cropped a bit on the bottom of the frame because when you hold your camera level, you're probably going to get more of the ground than you want.
Once you start to notice this and do it yourself, you'll find it's infectious and you will start doing it all the time - even on portraits, street photography, or anything else. Architectural photography makes you much more aware of what's in the background of your subjects, and helps to improve your framing and composition.
Perspectives
When photographing a building, you have essentially two options here:
Two-point perspectives...


... and single-point perspectives...


When Dan Cattermole tried his hand at shooting architecture the other day,, you'll notice that he used a two-point perspective for most of his shots. One of my suggestions to him was to mix it up a bit and try to find a good angle to shoot a single-point perspective, as well.
Context

The above shot illustrates how important context can be when photographing buildings. Imagine how uninteresting the photo would be without the airplane flying overhead... Also, you really wouldn't know an important part of the story about the building without it. One of the most important parts of architectural photography is demonstrating how a building interacts with its environment.
So taking a closely cropped shot of a building facade, for example, can be interesting...

...I always recommend backing up and absorbing the surroundings a bit.

So use everything available to you when shooting, to include people milling about, cars and trucks, the sky, sun, and clouds, or whatever else to help tell a story about your subject.
Lighting
In outside shots, this means paying attention to the orientation of the building and the angles you want to shoot in relation to the sun. A building can project completely different feelings on sunny vs. cloudy days, and on time of day and shadows. And trying to shoot an east-facing building at 5 in the afternoon is not likely to give you the results you're hoping for.
Bottom line is shooting with the sun at your back is likely to give you a nice, deep blue sky.

Shooting into the sun will give you a blown out, white sky like this (the sun was just to my left here).

I do use a flash outdoors sometimes to help fill in shadows and counter the sun, but you can only do so much. Most of the time, I don't have a big lighting rig - most of my shots are taken "on the fly", as it were.
My favorite time of day to shoot exteriors is the blue hour, because I get a nice color in the sky, hopefully some clouds here and there, enough ambient light to be able to see the building, and dark enough to see the interiors through the inside lighting.

Interiors
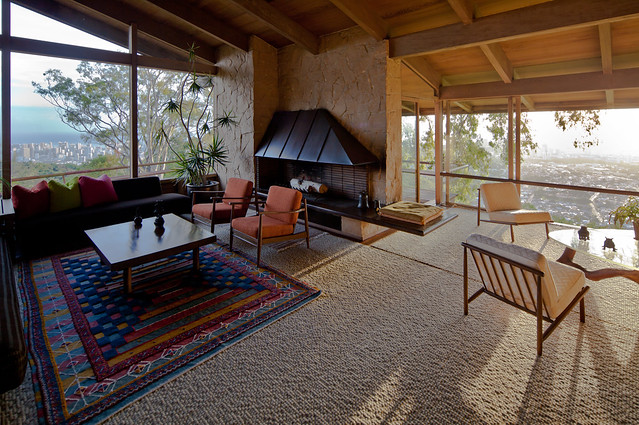
Interiors are definitely more difficult than exteriors. You're dealing with a constrained space, so it's hard to photograph in a way that is representative of how you experience the room when you're inside. If you shoot with an ultra-wide angle, you tend to get the fish eye effect and the room looks huge and distorted. If you shoot too narrow, you can't get enough in to get an accurate idea. The best way to tackle this is to find an interesting detail of the room and focus on it. In the case of the photo below, I really liked the form of the fireplace and the art and furniture on and around it. So I just lined up a shot of that, and ignored the rest of the room:

If you do want to go wide and try to take it all in, pick a focal point to lead the eye, rather than just a wide panorama with no discernible point. And don't forget to light your interior enough so that you are within the dynamic range of your camera to both inside and outside through the windows
Others
There are lots of other basic techniques that I haven't mentioned here but this post is getting long and I have other things I need to be doing so I'll close with that for now. Please feel free to ask any questions.
Back to Part III https://realphotographersforum.com/...ural-photography-part-iii-the-equipment.2918/
Part V https://realphotographersforum.com/...otography-part-v-finding-your-viewpoint.2948/
A lot of photographers have no interest in architectural photography because it's perceived as being too dry and documentary, with not enough opportunity as a creative outlet. Even many of you have commented that you never really gave much consideration to architectural photography before, and that's probably why. And frankly, you're mostly right. I'm not even religious and I still thank God every day that I don't have to go out and shoot anonymous rows of cubicles in some corporate headquarters to pay my rent like the poor guy who had to shoot this photo, here...
But it's not all about corporate office buildings and generic model homes, as I've hopefully demonstrated. There are a lot of very interesting buildings out there that are a lot of fun to photograph and hopefully to see and experience. And it is possible to follow the rules and still come up with images that are visually captivating for the general public, or at least other photographers. And part of the challenge is to find the interesting details and the features of a building that give it soul and character, and to emphasize those in a way that the photograph is able to impart at least some of the feeling of being there. But more on that in a later section. For now, let's talk about the rules and some basic techniques...
The rule about accurate depiction means that most photos of our built environment (houses, office buildings, etc.) that you see aren't "architectural photography" in the proper sense. For most people - including photographers - buildings are just meant to serve as a backdrop for their subject, so little attention is paid to whether the building is crooked. Even with the building is the main subject, it generally appears keystoned, which means that it looks like the walls are collapsing inward.
Here's an example of a keystoned building.
Keystoning
Our brains automatically correct what our eyes see without us realizing it so that in real life, we do always correct for perspective so buildings always appear to be standing up straight. The only exception to this is when we're standing directly under a tall building, you will still see that keystone effect - even with our own eyes.
However, cameras don't have the same brains we do (yet), so they don't make those corrections automatically. That means that if we tilt the camera upwards even slightly, it will cause the building to keystone. In architectural photography, we use techniques and/or specialized equipment to correct for that.
I already mentioned tilt-shift lenses. They are really essential for this sort of photography because they provide a means to correct for keystoning while taking the picture. This is much preferred to correcting the photo in PP, because it will distort the subject less, and will mean you will not have to crop and lose part of the frame.
Here's a photo of a subject taken with a regular wide-angle lens. Note that I needed to tilt the camera upwards to get the whole building in, and that lead to keystoning.
And here's a photo of the same building, taken with a tilt-shift lens. to take this shot, I held the camera directly level and perpendicular to the ground. This meant that the top of the building was cut off and I had a lot of street. So I shifted the lens upwards while keeping the camera level (i.e. not tilting it upwards), and the top of the building came into view.
Yes, it IS OK in architectural photography to depict a building as keystoned from time to time.
In fact, it's unavoidable on some of the taller buildings, depending on your angle. But if you're going to do it, exaggerate it a lot so that it appears intentional. Either go big or go home. If the building is only slightly tilted, it just appears you weren't paying attention or didn't know any better.
This is probably the single most important thing that distinguishes architectural photography from other types. It may seem like a small thing, and most people don't necessarily even notice. But in my experience, people do see it without realizing it. And people will generally prefer a photo that shows true perspectives without understanding why. They won't be able to tell you WHY they prefer it, but they will say they do.
So how do you achieve that if you don't have a TS lens? Well, I already talked about PP. But really, the easiest way to do it is to just make sure you're holding your camera straight and level. I have taken architectural photography shots with a standard 50mm prime on my DSLR...
Or a standard wide angle...
...or any other kind of lens just using this simple technique. The above shots were NOT perspective-corrected in PP in any way. I just cropped a bit on the bottom of the frame because when you hold your camera level, you're probably going to get more of the ground than you want.
Once you start to notice this and do it yourself, you'll find it's infectious and you will start doing it all the time - even on portraits, street photography, or anything else. Architectural photography makes you much more aware of what's in the background of your subjects, and helps to improve your framing and composition.
Perspectives
When photographing a building, you have essentially two options here:
Two-point perspectives...
... and single-point perspectives...
When Dan Cattermole tried his hand at shooting architecture the other day,, you'll notice that he used a two-point perspective for most of his shots. One of my suggestions to him was to mix it up a bit and try to find a good angle to shoot a single-point perspective, as well.
Context
The above shot illustrates how important context can be when photographing buildings. Imagine how uninteresting the photo would be without the airplane flying overhead... Also, you really wouldn't know an important part of the story about the building without it. One of the most important parts of architectural photography is demonstrating how a building interacts with its environment.
So taking a closely cropped shot of a building facade, for example, can be interesting...
...I always recommend backing up and absorbing the surroundings a bit.
So use everything available to you when shooting, to include people milling about, cars and trucks, the sky, sun, and clouds, or whatever else to help tell a story about your subject.
Lighting
In outside shots, this means paying attention to the orientation of the building and the angles you want to shoot in relation to the sun. A building can project completely different feelings on sunny vs. cloudy days, and on time of day and shadows. And trying to shoot an east-facing building at 5 in the afternoon is not likely to give you the results you're hoping for.
Bottom line is shooting with the sun at your back is likely to give you a nice, deep blue sky.
Shooting into the sun will give you a blown out, white sky like this (the sun was just to my left here).
I do use a flash outdoors sometimes to help fill in shadows and counter the sun, but you can only do so much. Most of the time, I don't have a big lighting rig - most of my shots are taken "on the fly", as it were.
My favorite time of day to shoot exteriors is the blue hour, because I get a nice color in the sky, hopefully some clouds here and there, enough ambient light to be able to see the building, and dark enough to see the interiors through the inside lighting.
Interiors
Interiors are definitely more difficult than exteriors. You're dealing with a constrained space, so it's hard to photograph in a way that is representative of how you experience the room when you're inside. If you shoot with an ultra-wide angle, you tend to get the fish eye effect and the room looks huge and distorted. If you shoot too narrow, you can't get enough in to get an accurate idea. The best way to tackle this is to find an interesting detail of the room and focus on it. In the case of the photo below, I really liked the form of the fireplace and the art and furniture on and around it. So I just lined up a shot of that, and ignored the rest of the room:
If you do want to go wide and try to take it all in, pick a focal point to lead the eye, rather than just a wide panorama with no discernible point. And don't forget to light your interior enough so that you are within the dynamic range of your camera to both inside and outside through the windows
Others
There are lots of other basic techniques that I haven't mentioned here but this post is getting long and I have other things I need to be doing so I'll close with that for now. Please feel free to ask any questions.
Back to Part III https://realphotographersforum.com/...ural-photography-part-iii-the-equipment.2918/
Part V https://realphotographersforum.com/...otography-part-v-finding-your-viewpoint.2948/

