Paul Lange
Moderator
Choosing Your Exposure.
So you understand aperture, shutter speed and ISO sensitivity and how they all interrelate. So what now? How do you start choosing your exposure rather than just letting your camera decide? Not sure? Well let me explain some fairly powerful concepts regarding exposure.
Mid Grey and 18% Reflectance.
You may have heard this term or a variation of it before. It is based on a concept developed by Kodak many years ago. Lets assume that a scene we want to photograph has tones ranging from black right through to white. We would want to choose the correct exposure that would be able to show as much detail as possible including all the variations of dark and light tones. Underexposure would mean that dark areas in our scene would come out black including a lot the tones that should be dark grey. Over exposure would mean that light areas would come out white including a lot of the tones that should be light grey. Exposing for mid grey makes the assumption that the correct exposure should be based on the midway point between black and white, ie. 50% black and 50% white or mid grey. Mid grey reflects 18% of the light that hits it. The result will be an image were anything in the scene that reflects 18% of the light falling on it will show as mid grey.

18% Gray Card is often noting more that a sheet of card or plastic - this one from Sekonic is slightly more fancy!
Dynamic Range.
Camera film and camera sensors cannot actually detect all the tones ranging from 100% black to 100% white at the same time. This means in reality the very lightest tones will display as white and the very darkest tones will display as black. However if exposure is correct all of the tones that are possible to be displayed will, making the most of what is possible. This limit is known as the dynamic range and different cameras and films have differing dynamic ranges.

(Image from Misha Ashton Photography)
The Problem with Metering for Mid Grey.
It is generally accepted that light meters both external and those built into cameras meter for mid grey. For modern cameras, however, there are two important deviations from this accepted principal. In order to understand the concept explained here at the moment we will only consider older basic meters. The meter takes an average value of the light reflected from the scene. The meter is calibrated so that it will tell us what exposure is required so that this average valve will exposed as mid grey. Now, this fairly sound if your scene has equal amounts of dark and light tones. The meter will tell us the correct exposure that will expose the average tone as mid grey on the resulting photograph. But what happens if are photographing a scene that has dark tones only or, conversely light tones only? It does'nt go well and this is why. Imagine a scene that has tones ranging from black to mid greys and no light tones at all. The meter will calculate the average tone on the scene which will be somewhere between black and mid grey, lets call it dark grey in this instance. Remember that the meter will tell us the exposure required to expose the average tone it has just calculated as mid grey. Well that’s the problem, in real life the tone in the scene is dark grey but in out photograph it will be mid grey. You will also get the counterpart problem with a scene that has only light tones. The mid tone lets call it light grey will be exposed as mid grey. This is why sometimes you may see photographs of grey snow.
The Two Important Deviations.
Remember that I said that for modern cameras there are two important deviations? The first one is that metering systems in modern cameras have 3; spot, center weighted and matrix. Spot metering takes a reading of a very small part of the scene and calculates the exposure required for that part to be exposed as mid grey. Center weighted metering calculates an average value but puts more emphasis on measuring the tones in the center of the scene and less on the edges. Matrix Metering takes different measurements from many different points of the scene. A computer then calculates what will probably be the correct exposure. Matrix Metering is an attempt to correct the problem explained above and can be reasonably accurate most of the time. However it can still be very inaccurate with some scenes resulting in unwanted results.
(Image from imaging-resource.com)
The second deviation is that modern metering systems (including those in handheld meters come to mention it) don’t actually meter for 18%. ANSI, the American National Standards Institute, decided, presumably to unify the matter by creating another standard, that, probably by a strenuous effort of mathematical mental masturbation, meters shouldn’t measure the intensity of reflected light. They came up with another method that equates to modern systems metering for approximately 12% reflectance, half a stop less than 18% reflectance. The figure of 12% is nominal as the actual figure is a little over 12% and is sometimes rounded up to 12.5% (and sometimes rounded up to 13% and apparently in Sekonic’s case 14%). Putting aside the seeming failure of a standardisation to make sure everybody sings from the same hymn sheet we must now look at what it is that we should do to get a correct exposure.
Getting the Correct Exposure.
Baring in mind what has been mentioned above we must look at ways of getting the correct exposure and luckily they are not as difficult as you might think. There are actually a few ways and knowing all of them will give you great scope for creativity.
Note: these methods involve you using the manual settings of your camera as you have to set the exposure yourself.
Using a Grey Card.
The first is simple you either purchase, print or paint an A4 or A5 card that is mid grey. Just make sure that it has a non reflective surface. To get a correct exposure of a scene you simply stand your card up anywhere convenient a few feet away in an area that is lit the same way as the scene and zoom in so the card fill the viewfinder. Spot meter the card and the result from the meter is technically the correct one. The principal is simple, you are metering the exposure so that anything that is mid grey or reflects 18% of the light falling on it will be exposed as mid grey. This also works for colour shots as well as we are interested in considering how much light is being reflected from the scene not what colour it is. Most people don’t seem to know that they cameras actually meter for the equivalent of around 12% reflectance and seem quite happy with this system. If you find you are not you can make the simple adjustment of increasing your exposure up half a stop. Your camera may have only 1/3 stop increments, if so just experiment with either 1/3 or 2/3 of a stop. For digital cameras you may find 2/3 stop is best, for film you may find 1/3 is best. We will get on to the reason for that later. The grey card method is good but there is little scope for calculated changes to exposure if you want to be creative.
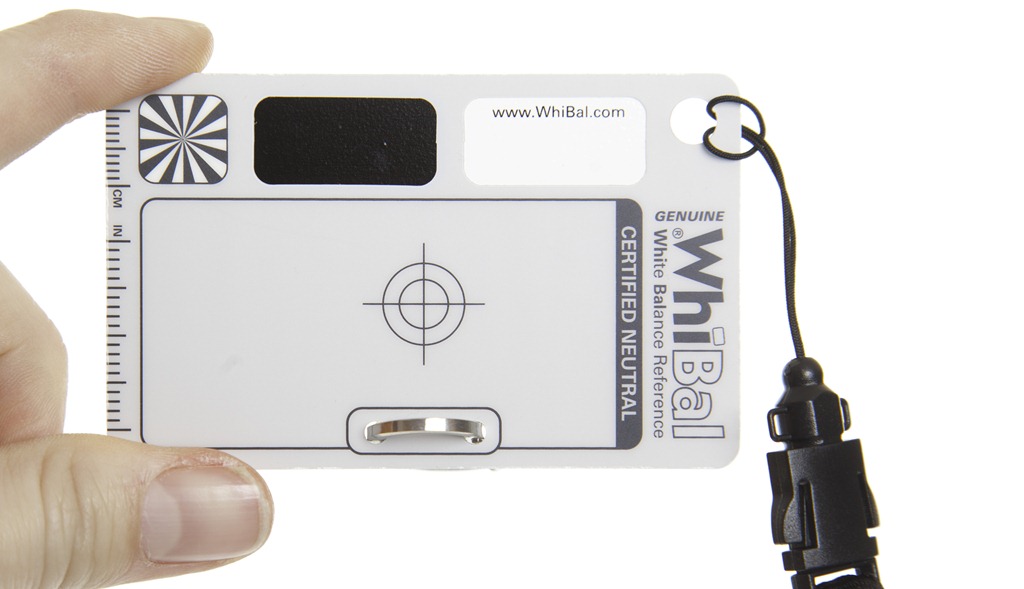
(Image from WhiBal.com via Gavtrain.com)
Don’t Want To Carry Your Grey Card Around.
No Problem! Find somewhere that is evenly lit with a good diffuse light and meter your grey card. Then meter something that you are likely to have with you when out with your camera. This can be anything that is a mid tone. Maybe your camera bag or rucksac has a part of it that is one colour, you can even use your hand, just make sure whatever it is it fills the viewfinder and you meter it in the same light as the grey card. Now make a note of how many stops different it is from the grey card reading. From now on you can use your object of choice and just modify the exposure to compensate.
Metering An Element in the Scene.
This is quite simple and you only have to remember a few simple principals.
Sky.
When shooting a scene where you have sky you meter the sky using matrix metering making sure that the sun (or moon) is not in the viewfinder. Once you have your reading recompose the shot and take it. How easy is that! This works well in most cases but there are a few deviations as follows.
Water.
Water reflects light 1 stop less than the sky. If you have a scene with water you have to make you decision on weather you meter the water or the sky. Remember when metering water you want to avoid having any large bright direct reflections from the sun in the viewfinder. You can of course go for the middle ground and meter the water and reduce exposure a fraction of a stop or meter the sky and increase exposure a fraction.
Green
Plants and greenery in general tend to be a good approximation of a 18% reflectance grey card. If your scene has a substantial amount of green or it is the main element of your composition meter that instead. Obviously some shades of green will be closer to 18% reflectance than others and a bit of experience may be required.
In all three of these principals it is important to meter when the sun or large direct reflections of it are not in the viewfinder. Pretty much the only time you should ignore this is when photographing close ups of the moon.
The Zone Method.
This is something that was pioneered by Ansel Adams and while originally developed for film it can be modified for digital. It works on the basis of exposing dark tones optimally for detail. However in order to do this there is the potential to either underexpose or overexpose light tones. This is not a problem though as correction of light tones can be performed in the dark room. Now, remember a while back in the “Using A Grey Card” section it was mentioned that the optimal correction for a digital camera may differ from that of film camera? Well, now we come to part of the reason why. With a digital camera if shooting in RAW format it is possible to expose for optimal detail of light tones and then compensate for the incorrect exposure of the dark tones during post processing on the computer. This means that for digital we must modify Ansel Adams original Zone Method.

(Image from luminous-landscape.com)
The Original Zone Method.
The Zone Method is based on 10 arbitrary zones representing a range of 10 tones from white to black as follows:
Zone IX - Un exposed white of the photographic paper
Zone VIII - Bright highlights with no highlight detail
Zone VII - Highlights with highlight detail
Zone VI - Darker highlights best thought of as being the highlights of Caucasian skin.
Zone V - Mid grey
Zone IV - Lighter shadow tones best though of as being Caucasian skin in shadow
Zone III - Dark tones with shadow detail
Zone II - Dark tones with no shadow detail
Zone I - Black
Zone 0 - Maximum possible black that can be printed on the paper
In the scene to be photographed we look for the areas that have shadows where we want full shadow details to be seen and take a spot meter reading. This area of shadow with detail is Zone III on our above scale but we have just metered it for mid grey and so we must correct for this. We do this by noting that mid grey is Zone V which is 2 zones away from Zone III. Therefore we reduce exposure by 2 stops, one stop for each zone. We now spot meter an area of highlights in our scene where we want full highlight detail and note how many stops it is from our first reading. For the highlights to be exposed so that we can see the highlight details within them they must fall inside Zone VII, four stops brighter than Zone III. If the meter reading is less than four stops brighter the highlight areas will be underexposed. Correspondingly if the meter reading is greater than four stops brighter they will be over exposed. This difference in meter readings has to be noted and referred to during processing in the darkroom where the highlights can be either underexposed or overexposed on the photographic paper in order to compensate for any incorrect exposure of the highlights on the negative.
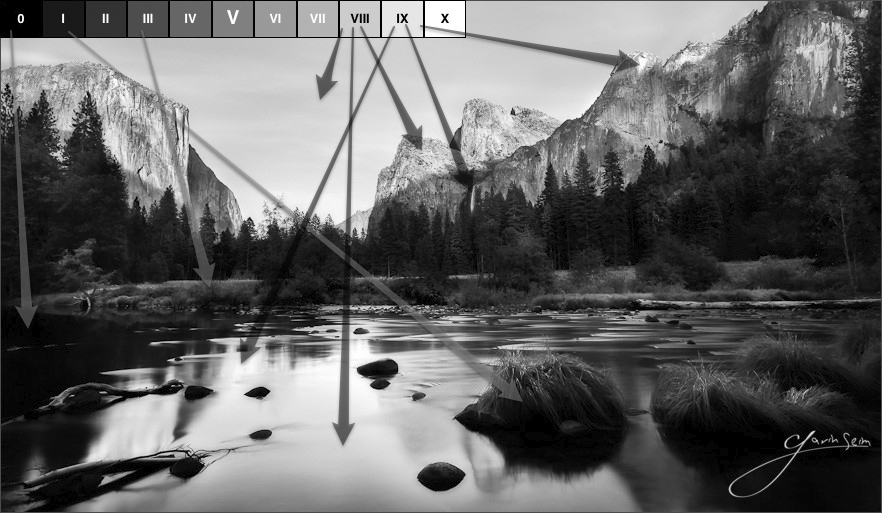
An example of allocating zones from f164.com
The Modified Zone Method for Digital
This method works best when shooting in RAW mode as you have far more dynamic range and control post process on the computer than saving your photo’s as JPEGS. Post process for RAW images is different than when developing film because you have more control when reducing brightness of the shadow tones. When processing a RAW image on the computer you have an Exposure control that allows for post shoot adjustment. Because of the way a digital camera sensor works you can overexpose an image to the point just before highlights loose detail and then non destructively reduce exposure post process. This is because you have obtained all of the information regarding the scene and it is stored as raw data. The computer can then mathematically reduce the relative values of that data. What is even more impressive is that you can control this adjustment so that only dark tones are changed. In some software you also have control of the threshold which allows you to choose what tones are adjusted. Different software have different names for these controls and some allow much better control than others. Pretty much all of them have the Exposure control. The control for reducing exposure for shadow tones only is usually called blacks. Due to the many variations of software it’s really up to you to find out how the result is best achieved with the software that you have. Post process exposure can also be increased but to a much lesser degree before it becomes destructive. Eventually you get to a point where for underexposed areas you just don’t have the data available. This means that it is impossible to calculate the new values for the underexposed areas and an effect called posterisation occurs. Posterisation is when you have large stepped changes in tones instead of smooth transitions between areas of different brightness.
To utilise the Zone Method for digital cameras you choose an area in your scene where you want highlights with full highlight detail and take a spot meter reading. According to the table above this area of highlights is zone VII. We have just metered it for mid grey, 2 zones difference and must compensate by increasing exposure 2 stops, one for each zone. Now what’s neat about this is that you don’t really have to bother spot metering the shadow area where you want shadow detail. The beauty of the post process exposure control is that you can fine tune it and see the result instantly on screen without wasting expensive photographic paper. One issue to note though, good photographic film and paper effectively has a greater dynamic range than even many expensive cameras. You may find that increasing exposure by 2 stops overexposes the highlights even beyond the point of being recoverable. You may have to reduce your increase in exposure to below 2 stops.
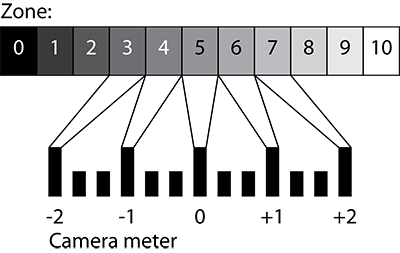
(Image from Nick Miners Photography)
Exposing To The Right.
The average digital SLR capable of processing a 12 bit RAW file can record 4096 discrete tones. The problem with this is that it is far better at recording variations in light tones than dark tones. The camera will record the tiniest difference between the lightest tones and this accuracy degrades gradually as the tones get darker. At the other end of the spectrum the camera needs to see a relatively huge change from one dark tone to the next before it can record it. If you were to take a shot of a dark scene ranging from mid grey to almost complete darkness and expose it properly chances are the camera will only record just over one thousand different tones. Now if you overexposed your next shot almost to the point where the mid grey tones record as white (just before zone VIII) the camera will record over three thousand different tones. This means that transition from one tone to the next on your final image will be much smoother which has a huge impact on image quality. Exposing To The Right is a technique where you do just this and then during post process reduce exposure. Reducing exposure post process darkens all of the tones you have recorded and having over three thousand of them is much better than having only one thousand. Exposing To The Right gets it’s name from the way the intensity of each tone is displayed on a graph called a histogram. Light tones are displayed on the right, dark on the left. When Exposing To The Right you aim to have as many tones as possible displayed as far right as possible on the histogram without any of them clipping (overexposed to the point where the tone is recorded at 100% white). You can tell if you have a clipped tone as the reading on the histogram will be at the very top of the graph. Reading histograms requires a bit of knowledge on how to interpret them usually gleaned from experience and is not particularly easy. Every digital SLR will show a histogram of the exposure and it is worth reviewing it after each shoot so that you gradually get a feel on how to read them. Many cameras have Live View which is the fancy name for when your cameras LCD screen shows the image so you don't have to use the viewfinder. These often show the histogram in real time so you can review it before even taking the shot. This may sound wonderful but there is a "but", In order for the histogram to display in real time it is based on a low resolution JPEG image from the camera as these contain less data which can be processed very quickly. If the camera had to process RAW image data the histogram would display changes very slowly as RAW images contain vastly more data than JPEGS. JPEGS don't have the same dynamic range as RAW images and clipping begins much earlier. This means that the histogram will show tones are being clipped when in fact on your RAW image they are not making the live histogram even more difficult to interpret. However there is another much easier way. Almost all digital SLR’s will have a highlight clipping indicator. Quite often it is not activated as standard and you have to find the relevant setting on your camera. The indicator flashes any part of the image that is overexposed to the point of being recorded as 100% white on the cameras screen.. The technique is quite simple, you just over expose until you see the indicator flash. It’s worth noting that some highlight indicators are a bit conservative and often you can actually overexpose 1/3 to 1/2 stop further once the indicator has activated.
.jpg)
(Image from photoradar.com)
A feature appearing on digital cameras more regularly is a setting that claims to allow the camera to extend its dynamic range, Nikon call it Active Dynamic Lighting (ADL). Some other manufacturers have their version of this and call it something different. There are two possible ways this can work. Possibly the camera can expose shadows for a greater duration than light tones. In a sense exposing the shadows to the right more than lighter tones. Expose your image to the right to the point of highlights clipping and this could be quite a powerful thing. Effectively you are cramming your exposure up to where your camera can record the smallest changes in tone very accurately far more than you could otherwise. However it could just be the case that the camera is exposing to the right and performing the post process adjustments for you taking some of your control away. The best way of finding out if this setting works for you is really to take some shots of varying lighting situations with and without it and see what yields the best results post process.
Signal To Noise Ratio.
The pixels on a camera sensor tend to generate spurious signals when very little or even no light is falling on them. The amount of spurious noise generated by the sensor is called the noise floor and is the minimum signal possible. Oh my god it's all getting very technical,why do I have to wrap my head around all this stuff, will it even effect me? You may ask. Well, some areas of deep shadow will only reflect a tiny amount of light at your camera. If this meager amount is not enough to create a signal that is higher in intensity than the spurious noise signal it won't register, it will be below the noise floor. Imagine that you are in a room of a hundred people all talking. Your friend says something to you so quietly that his voice is not loud enough to be heard of the other ninety eight voices. You wont hear him, his voice is below the noise floor. Now this is a good example because we can expand on it to illustrate what signal to noise is in easy to understand terms. Realising that you didn't hear him he repeats a bit louder this time. You catch most of what he says now as his voice is just above the noise floor. You reply but he looks at you with an odd expression, you obviously didn't quite catch enough of what he said. He repeats much louder now and you hear him fine, in fact most of the people around you do too but what the hell, his voice was well above the noise floor and you now know what he was on about. The signal to noise ratio is the difference between the signal (in the example your friends voice) and the noise floor (the other ninety eight conversations in the room). Think of shadow tones as quiet and highlights as loud. By exposing to the right you are exposing the shadow tones lighter which means they are well above the noise floor.
OK, well what one of these techniques is best? The answer is all and none although Exposing To The Right is generally a good thing to do all the time. The others are really there to get you in the ball park first. Of course you could just up exposure until your highlight indicator come on and leave it at that and it will probably work fine for you. However using the other methods forces you to think about the pre-visualisation of your shot. What areas do you want detail? do you want some areas to have blown out highlights or to be plunged into darkness? Is the available light right for what you are trying to achieve? If not, should you wait until the light is right? Thinking about these things allows you to add yet another dynamic to your photographs.
So you understand aperture, shutter speed and ISO sensitivity and how they all interrelate. So what now? How do you start choosing your exposure rather than just letting your camera decide? Not sure? Well let me explain some fairly powerful concepts regarding exposure.
Mid Grey and 18% Reflectance.
You may have heard this term or a variation of it before. It is based on a concept developed by Kodak many years ago. Lets assume that a scene we want to photograph has tones ranging from black right through to white. We would want to choose the correct exposure that would be able to show as much detail as possible including all the variations of dark and light tones. Underexposure would mean that dark areas in our scene would come out black including a lot the tones that should be dark grey. Over exposure would mean that light areas would come out white including a lot of the tones that should be light grey. Exposing for mid grey makes the assumption that the correct exposure should be based on the midway point between black and white, ie. 50% black and 50% white or mid grey. Mid grey reflects 18% of the light that hits it. The result will be an image were anything in the scene that reflects 18% of the light falling on it will show as mid grey.
18% Gray Card is often noting more that a sheet of card or plastic - this one from Sekonic is slightly more fancy!
Dynamic Range.
Camera film and camera sensors cannot actually detect all the tones ranging from 100% black to 100% white at the same time. This means in reality the very lightest tones will display as white and the very darkest tones will display as black. However if exposure is correct all of the tones that are possible to be displayed will, making the most of what is possible. This limit is known as the dynamic range and different cameras and films have differing dynamic ranges.
(Image from Misha Ashton Photography)
The Problem with Metering for Mid Grey.
It is generally accepted that light meters both external and those built into cameras meter for mid grey. For modern cameras, however, there are two important deviations from this accepted principal. In order to understand the concept explained here at the moment we will only consider older basic meters. The meter takes an average value of the light reflected from the scene. The meter is calibrated so that it will tell us what exposure is required so that this average valve will exposed as mid grey. Now, this fairly sound if your scene has equal amounts of dark and light tones. The meter will tell us the correct exposure that will expose the average tone as mid grey on the resulting photograph. But what happens if are photographing a scene that has dark tones only or, conversely light tones only? It does'nt go well and this is why. Imagine a scene that has tones ranging from black to mid greys and no light tones at all. The meter will calculate the average tone on the scene which will be somewhere between black and mid grey, lets call it dark grey in this instance. Remember that the meter will tell us the exposure required to expose the average tone it has just calculated as mid grey. Well that’s the problem, in real life the tone in the scene is dark grey but in out photograph it will be mid grey. You will also get the counterpart problem with a scene that has only light tones. The mid tone lets call it light grey will be exposed as mid grey. This is why sometimes you may see photographs of grey snow.
The Two Important Deviations.
Remember that I said that for modern cameras there are two important deviations? The first one is that metering systems in modern cameras have 3; spot, center weighted and matrix. Spot metering takes a reading of a very small part of the scene and calculates the exposure required for that part to be exposed as mid grey. Center weighted metering calculates an average value but puts more emphasis on measuring the tones in the center of the scene and less on the edges. Matrix Metering takes different measurements from many different points of the scene. A computer then calculates what will probably be the correct exposure. Matrix Metering is an attempt to correct the problem explained above and can be reasonably accurate most of the time. However it can still be very inaccurate with some scenes resulting in unwanted results.
(Image from imaging-resource.com)
The second deviation is that modern metering systems (including those in handheld meters come to mention it) don’t actually meter for 18%. ANSI, the American National Standards Institute, decided, presumably to unify the matter by creating another standard, that, probably by a strenuous effort of mathematical mental masturbation, meters shouldn’t measure the intensity of reflected light. They came up with another method that equates to modern systems metering for approximately 12% reflectance, half a stop less than 18% reflectance. The figure of 12% is nominal as the actual figure is a little over 12% and is sometimes rounded up to 12.5% (and sometimes rounded up to 13% and apparently in Sekonic’s case 14%). Putting aside the seeming failure of a standardisation to make sure everybody sings from the same hymn sheet we must now look at what it is that we should do to get a correct exposure.
Getting the Correct Exposure.
Baring in mind what has been mentioned above we must look at ways of getting the correct exposure and luckily they are not as difficult as you might think. There are actually a few ways and knowing all of them will give you great scope for creativity.
Note: these methods involve you using the manual settings of your camera as you have to set the exposure yourself.
Using a Grey Card.
The first is simple you either purchase, print or paint an A4 or A5 card that is mid grey. Just make sure that it has a non reflective surface. To get a correct exposure of a scene you simply stand your card up anywhere convenient a few feet away in an area that is lit the same way as the scene and zoom in so the card fill the viewfinder. Spot meter the card and the result from the meter is technically the correct one. The principal is simple, you are metering the exposure so that anything that is mid grey or reflects 18% of the light falling on it will be exposed as mid grey. This also works for colour shots as well as we are interested in considering how much light is being reflected from the scene not what colour it is. Most people don’t seem to know that they cameras actually meter for the equivalent of around 12% reflectance and seem quite happy with this system. If you find you are not you can make the simple adjustment of increasing your exposure up half a stop. Your camera may have only 1/3 stop increments, if so just experiment with either 1/3 or 2/3 of a stop. For digital cameras you may find 2/3 stop is best, for film you may find 1/3 is best. We will get on to the reason for that later. The grey card method is good but there is little scope for calculated changes to exposure if you want to be creative.
(Image from WhiBal.com via Gavtrain.com)
Don’t Want To Carry Your Grey Card Around.
No Problem! Find somewhere that is evenly lit with a good diffuse light and meter your grey card. Then meter something that you are likely to have with you when out with your camera. This can be anything that is a mid tone. Maybe your camera bag or rucksac has a part of it that is one colour, you can even use your hand, just make sure whatever it is it fills the viewfinder and you meter it in the same light as the grey card. Now make a note of how many stops different it is from the grey card reading. From now on you can use your object of choice and just modify the exposure to compensate.
Metering An Element in the Scene.
This is quite simple and you only have to remember a few simple principals.
Sky.
When shooting a scene where you have sky you meter the sky using matrix metering making sure that the sun (or moon) is not in the viewfinder. Once you have your reading recompose the shot and take it. How easy is that! This works well in most cases but there are a few deviations as follows.
Water.
Water reflects light 1 stop less than the sky. If you have a scene with water you have to make you decision on weather you meter the water or the sky. Remember when metering water you want to avoid having any large bright direct reflections from the sun in the viewfinder. You can of course go for the middle ground and meter the water and reduce exposure a fraction of a stop or meter the sky and increase exposure a fraction.
Green
Plants and greenery in general tend to be a good approximation of a 18% reflectance grey card. If your scene has a substantial amount of green or it is the main element of your composition meter that instead. Obviously some shades of green will be closer to 18% reflectance than others and a bit of experience may be required.
In all three of these principals it is important to meter when the sun or large direct reflections of it are not in the viewfinder. Pretty much the only time you should ignore this is when photographing close ups of the moon.
The Zone Method.
This is something that was pioneered by Ansel Adams and while originally developed for film it can be modified for digital. It works on the basis of exposing dark tones optimally for detail. However in order to do this there is the potential to either underexpose or overexpose light tones. This is not a problem though as correction of light tones can be performed in the dark room. Now, remember a while back in the “Using A Grey Card” section it was mentioned that the optimal correction for a digital camera may differ from that of film camera? Well, now we come to part of the reason why. With a digital camera if shooting in RAW format it is possible to expose for optimal detail of light tones and then compensate for the incorrect exposure of the dark tones during post processing on the computer. This means that for digital we must modify Ansel Adams original Zone Method.
(Image from luminous-landscape.com)
The Original Zone Method.
The Zone Method is based on 10 arbitrary zones representing a range of 10 tones from white to black as follows:
Zone IX - Un exposed white of the photographic paper
Zone VIII - Bright highlights with no highlight detail
Zone VII - Highlights with highlight detail
Zone VI - Darker highlights best thought of as being the highlights of Caucasian skin.
Zone V - Mid grey
Zone IV - Lighter shadow tones best though of as being Caucasian skin in shadow
Zone III - Dark tones with shadow detail
Zone II - Dark tones with no shadow detail
Zone I - Black
Zone 0 - Maximum possible black that can be printed on the paper
In the scene to be photographed we look for the areas that have shadows where we want full shadow details to be seen and take a spot meter reading. This area of shadow with detail is Zone III on our above scale but we have just metered it for mid grey and so we must correct for this. We do this by noting that mid grey is Zone V which is 2 zones away from Zone III. Therefore we reduce exposure by 2 stops, one stop for each zone. We now spot meter an area of highlights in our scene where we want full highlight detail and note how many stops it is from our first reading. For the highlights to be exposed so that we can see the highlight details within them they must fall inside Zone VII, four stops brighter than Zone III. If the meter reading is less than four stops brighter the highlight areas will be underexposed. Correspondingly if the meter reading is greater than four stops brighter they will be over exposed. This difference in meter readings has to be noted and referred to during processing in the darkroom where the highlights can be either underexposed or overexposed on the photographic paper in order to compensate for any incorrect exposure of the highlights on the negative.
An example of allocating zones from f164.com
The Modified Zone Method for Digital
This method works best when shooting in RAW mode as you have far more dynamic range and control post process on the computer than saving your photo’s as JPEGS. Post process for RAW images is different than when developing film because you have more control when reducing brightness of the shadow tones. When processing a RAW image on the computer you have an Exposure control that allows for post shoot adjustment. Because of the way a digital camera sensor works you can overexpose an image to the point just before highlights loose detail and then non destructively reduce exposure post process. This is because you have obtained all of the information regarding the scene and it is stored as raw data. The computer can then mathematically reduce the relative values of that data. What is even more impressive is that you can control this adjustment so that only dark tones are changed. In some software you also have control of the threshold which allows you to choose what tones are adjusted. Different software have different names for these controls and some allow much better control than others. Pretty much all of them have the Exposure control. The control for reducing exposure for shadow tones only is usually called blacks. Due to the many variations of software it’s really up to you to find out how the result is best achieved with the software that you have. Post process exposure can also be increased but to a much lesser degree before it becomes destructive. Eventually you get to a point where for underexposed areas you just don’t have the data available. This means that it is impossible to calculate the new values for the underexposed areas and an effect called posterisation occurs. Posterisation is when you have large stepped changes in tones instead of smooth transitions between areas of different brightness.
To utilise the Zone Method for digital cameras you choose an area in your scene where you want highlights with full highlight detail and take a spot meter reading. According to the table above this area of highlights is zone VII. We have just metered it for mid grey, 2 zones difference and must compensate by increasing exposure 2 stops, one for each zone. Now what’s neat about this is that you don’t really have to bother spot metering the shadow area where you want shadow detail. The beauty of the post process exposure control is that you can fine tune it and see the result instantly on screen without wasting expensive photographic paper. One issue to note though, good photographic film and paper effectively has a greater dynamic range than even many expensive cameras. You may find that increasing exposure by 2 stops overexposes the highlights even beyond the point of being recoverable. You may have to reduce your increase in exposure to below 2 stops.
(Image from Nick Miners Photography)
Exposing To The Right.
The average digital SLR capable of processing a 12 bit RAW file can record 4096 discrete tones. The problem with this is that it is far better at recording variations in light tones than dark tones. The camera will record the tiniest difference between the lightest tones and this accuracy degrades gradually as the tones get darker. At the other end of the spectrum the camera needs to see a relatively huge change from one dark tone to the next before it can record it. If you were to take a shot of a dark scene ranging from mid grey to almost complete darkness and expose it properly chances are the camera will only record just over one thousand different tones. Now if you overexposed your next shot almost to the point where the mid grey tones record as white (just before zone VIII) the camera will record over three thousand different tones. This means that transition from one tone to the next on your final image will be much smoother which has a huge impact on image quality. Exposing To The Right is a technique where you do just this and then during post process reduce exposure. Reducing exposure post process darkens all of the tones you have recorded and having over three thousand of them is much better than having only one thousand. Exposing To The Right gets it’s name from the way the intensity of each tone is displayed on a graph called a histogram. Light tones are displayed on the right, dark on the left. When Exposing To The Right you aim to have as many tones as possible displayed as far right as possible on the histogram without any of them clipping (overexposed to the point where the tone is recorded at 100% white). You can tell if you have a clipped tone as the reading on the histogram will be at the very top of the graph. Reading histograms requires a bit of knowledge on how to interpret them usually gleaned from experience and is not particularly easy. Every digital SLR will show a histogram of the exposure and it is worth reviewing it after each shoot so that you gradually get a feel on how to read them. Many cameras have Live View which is the fancy name for when your cameras LCD screen shows the image so you don't have to use the viewfinder. These often show the histogram in real time so you can review it before even taking the shot. This may sound wonderful but there is a "but", In order for the histogram to display in real time it is based on a low resolution JPEG image from the camera as these contain less data which can be processed very quickly. If the camera had to process RAW image data the histogram would display changes very slowly as RAW images contain vastly more data than JPEGS. JPEGS don't have the same dynamic range as RAW images and clipping begins much earlier. This means that the histogram will show tones are being clipped when in fact on your RAW image they are not making the live histogram even more difficult to interpret. However there is another much easier way. Almost all digital SLR’s will have a highlight clipping indicator. Quite often it is not activated as standard and you have to find the relevant setting on your camera. The indicator flashes any part of the image that is overexposed to the point of being recorded as 100% white on the cameras screen.. The technique is quite simple, you just over expose until you see the indicator flash. It’s worth noting that some highlight indicators are a bit conservative and often you can actually overexpose 1/3 to 1/2 stop further once the indicator has activated.
(Image from photoradar.com)
A feature appearing on digital cameras more regularly is a setting that claims to allow the camera to extend its dynamic range, Nikon call it Active Dynamic Lighting (ADL). Some other manufacturers have their version of this and call it something different. There are two possible ways this can work. Possibly the camera can expose shadows for a greater duration than light tones. In a sense exposing the shadows to the right more than lighter tones. Expose your image to the right to the point of highlights clipping and this could be quite a powerful thing. Effectively you are cramming your exposure up to where your camera can record the smallest changes in tone very accurately far more than you could otherwise. However it could just be the case that the camera is exposing to the right and performing the post process adjustments for you taking some of your control away. The best way of finding out if this setting works for you is really to take some shots of varying lighting situations with and without it and see what yields the best results post process.
Signal To Noise Ratio.
The pixels on a camera sensor tend to generate spurious signals when very little or even no light is falling on them. The amount of spurious noise generated by the sensor is called the noise floor and is the minimum signal possible. Oh my god it's all getting very technical,why do I have to wrap my head around all this stuff, will it even effect me? You may ask. Well, some areas of deep shadow will only reflect a tiny amount of light at your camera. If this meager amount is not enough to create a signal that is higher in intensity than the spurious noise signal it won't register, it will be below the noise floor. Imagine that you are in a room of a hundred people all talking. Your friend says something to you so quietly that his voice is not loud enough to be heard of the other ninety eight voices. You wont hear him, his voice is below the noise floor. Now this is a good example because we can expand on it to illustrate what signal to noise is in easy to understand terms. Realising that you didn't hear him he repeats a bit louder this time. You catch most of what he says now as his voice is just above the noise floor. You reply but he looks at you with an odd expression, you obviously didn't quite catch enough of what he said. He repeats much louder now and you hear him fine, in fact most of the people around you do too but what the hell, his voice was well above the noise floor and you now know what he was on about. The signal to noise ratio is the difference between the signal (in the example your friends voice) and the noise floor (the other ninety eight conversations in the room). Think of shadow tones as quiet and highlights as loud. By exposing to the right you are exposing the shadow tones lighter which means they are well above the noise floor.
OK, well what one of these techniques is best? The answer is all and none although Exposing To The Right is generally a good thing to do all the time. The others are really there to get you in the ball park first. Of course you could just up exposure until your highlight indicator come on and leave it at that and it will probably work fine for you. However using the other methods forces you to think about the pre-visualisation of your shot. What areas do you want detail? do you want some areas to have blown out highlights or to be plunged into darkness? Is the available light right for what you are trying to achieve? If not, should you wait until the light is right? Thinking about these things allows you to add yet another dynamic to your photographs.
")