Paul Taylor
Well-Known Member
After having success with my resin printed (Creality Halot Mage - great resin printer. Love the thing) 6x12 and fdm printed (AnyCubic Kobra Max - mediocre machine, but it has huge print volume) 6x17 - I started looking for a handheld 4x5 (mainly to use my Lomography graflex compatible instax wide back.
Much to my surprise - someone made the files for such a thing. The "WillTravel" camera - which is available in a variety of sizes including 4x5, and one made to use a 90mm lens.
In celebration (not really, but that is how I am justifying it) last week - I bought another 3D printer. This time a Bambu Labs P1S with the AMS Pro 2 (for multicolor / multimaterial prints)& hardened nozzle/gears (so I can print carbon fiber/nylon/glassfiber/PC/etc filaments.)
After it arrived - I printed more or less non-stop of about 90 hours to verify the machine was good-to-go and it most certainly is. This machine is by far the nicest/feature rich/integrated machine I have owned over 15 years of consumer level printing. I honestly don't know why people by anything else - it is that good. The prints are absolutely gorgeous, the multicolor/material part of the machine works flawlessly, the phone app is great - I can check status when not at home and see a live video stream.
So here is the link to the person who designed the camera :
The person who created it says it involves about 30-40 hours print time. I am less than 12 in and basically done with the printed parts. The Bambu P1S is very fast (for a 3d printer.)
I also found this on MakerWorld, so decided to print it :
 PXL_20250729_142400418 by Paul Taylor, on Flickr
 PXL_20250729_142605855 by Paul Taylor, on Flickr
But here is the current status of the handheld 4x5 camera :
 PXL_20250731_212145314 by Paul Taylor, on Flickr
Ground glass holder, side grip, copal zero "lens board" for the 65mm Helicoid (bought off amazon.)
 PXL_20250731_213532971 by Paul Taylor, on Flickr
The main body, film back alignment plate (in yellow) and two different ground glass carriers (have to figure out which one I will like better.)
 PXL_20250731_214457297 by Paul Taylor, on Flickr
This machine makes for absolutely beautiful and accurate prints, here are the threads on the body for the 65mm Helicoid.
 PXL_20250731_214550514 by Paul Taylor, on Flickr
The various little bungee parts that hold the backs on:
 PXL_20250731_214810973 by Paul Taylor, on Flickr
Perfect fit with a 4x5 film holder and the Lomography back. The alignment strip on the backs click in perfectly.
 PXL_20250731_214639361.PORTRAIT by Paul Taylor, on Flickr
 PXL_20250731_214657458.PORTRAIT by Paul Taylor, on Flickr
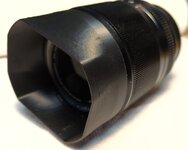
And for a bonus - I nearly bought this earlier today. Resisted the urge. Might go back.
 PXL_20250731_200736963 by Paul Taylor, on Flickr
Lol.
Much to my surprise - someone made the files for such a thing. The "WillTravel" camera - which is available in a variety of sizes including 4x5, and one made to use a 90mm lens.
In celebration (not really, but that is how I am justifying it) last week - I bought another 3D printer. This time a Bambu Labs P1S with the AMS Pro 2 (for multicolor / multimaterial prints)& hardened nozzle/gears (so I can print carbon fiber/nylon/glassfiber/PC/etc filaments.)
After it arrived - I printed more or less non-stop of about 90 hours to verify the machine was good-to-go and it most certainly is. This machine is by far the nicest/feature rich/integrated machine I have owned over 15 years of consumer level printing. I honestly don't know why people by anything else - it is that good. The prints are absolutely gorgeous, the multicolor/material part of the machine works flawlessly, the phone app is great - I can check status when not at home and see a live video stream.
So here is the link to the person who designed the camera :
The person who created it says it involves about 30-40 hours print time. I am less than 12 in and basically done with the printed parts. The Bambu P1S is very fast (for a 3d printer.)
I also found this on MakerWorld, so decided to print it :
 PXL_20250729_142400418 by Paul Taylor, on Flickr
 PXL_20250729_142605855 by Paul Taylor, on Flickr
But here is the current status of the handheld 4x5 camera :
 PXL_20250731_212145314 by Paul Taylor, on Flickr
Ground glass holder, side grip, copal zero "lens board" for the 65mm Helicoid (bought off amazon.)
 PXL_20250731_213532971 by Paul Taylor, on Flickr
The main body, film back alignment plate (in yellow) and two different ground glass carriers (have to figure out which one I will like better.)
 PXL_20250731_214457297 by Paul Taylor, on Flickr
This machine makes for absolutely beautiful and accurate prints, here are the threads on the body for the 65mm Helicoid.
 PXL_20250731_214550514 by Paul Taylor, on Flickr
The various little bungee parts that hold the backs on:
 PXL_20250731_214810973 by Paul Taylor, on Flickr
Perfect fit with a 4x5 film holder and the Lomography back. The alignment strip on the backs click in perfectly.
 PXL_20250731_214639361.PORTRAIT by Paul Taylor, on Flickr
 PXL_20250731_214657458.PORTRAIT by Paul Taylor, on Flickr
And for a bonus - I nearly bought this earlier today. Resisted the urge. Might go back.
 PXL_20250731_200736963 by Paul Taylor, on Flickr
Lol.


