Time lapse with my D3?

Hamish Gill

Tech Support (and Marketing)
Can anyone explain how I would go about making a time lapse video with my d3
Im having a wall knocked out in and the floor replacing in my living room/dining room... i thought it might make an interesting times lapse video if i recorded all the work taking place ... DIY SOS stylee ;)
Any thoughts on how i might go about it?
 
I have done time lapse, tethered via both Nikon software (Trial version) and a third party software.
Not sure what software you have bundled with D3 but as I remember Nikon tend to sell their software as an option, but I'm sure you know that, Canon usually comes bundled with it.
I did some in car at night driving through Worcester, but didn't do anything with it in the end I was just playing about but like the concept of time laspe.......
Most tethered software allows interval settings ranging from 1 sec up to whatever.
Set up is relatively simple, set up switch on and let it go....
Then it's all a question of what software you want to use to create your video
 
Mmm then that'll be a problem unless you got a wireless module for it or of course a looooooooooooong usb lead gaffer taped around the room :) guess thats one of the problems with this sort of stuff, too much stuff around
 
Hamish, you can do it in camera using the Interval Shooting option in the Shooting menu (if it's greyed out it's because you probably don't have Daylight Saving ticked in the date and time settings). In this section you can set the interval and the number of shots per interval plus start time etc. For this sort of thing you probably want to use a slowish shutter speed (1/60) to give a bit of blur from any movement between frames (mind, UK builders - maybe a second might be better! ;) ). Choosing the interval might be a bit more tricky though as it depends on how quickly things happen and how long you want your playback to be (bear in mind you will probably play back at 24 - 25 fps). Maybe err the cautious side (within the limits of the cards) and plan to edit out the tea breaks etc. Then set aperture etc and start it off (after ensuring the battery is fully charged). Once you've got your shots (Medium JPEG might be the best option) you can then import the frame sequence into an editor - what do you have available? If you are very ambitious you could use auto-bracketing and go for the type of HDR effect that you saw in those landscape time-lapse series (but maybe not for the living room!).
 
Ah... Sweetness, I didn't know it did interval shooting!
Right, I just need a way to fit it to the wall...
We are expecting the work to take 2 weeks so the camera will need to be charged, I'll need access to see the screen, change the battery and memory card etc without disturbing the angle.

It's going to go on this wall

cdbfc3a0.jpg


I'm thinking some sort of ball and socket head ... But what to fit that to?
 
Last edited:
Now I sort of thought the D3 was cleverer than just single shot or a need for tethering.........am looking forward to the results
 
Ok I have quickly knocked something up.

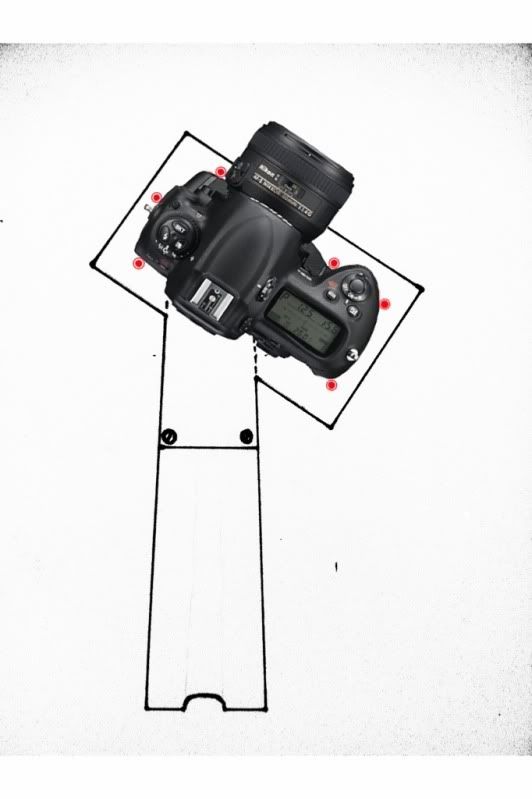
Basically keeping cost to a minimum the jig will consist of a cheap metal wall braket as Hamish mentioned in a previous post a 3-4 mm thick aluminium base plate , chosen for ease of metal work and lightweight. This will be bolted to the bracket and a number of nylon lugs in the base plate to secure the cameras position.

The lugs will act as a kind of a tight fitting cage so the D3 can be placed snugly and have no movement. This will ensure every time the camera is taken out it is replaced in exactly the same position.
The key to this is the elimination of any moving parts. A ball joint or hinges will just cause problems

03d9c874.jpg


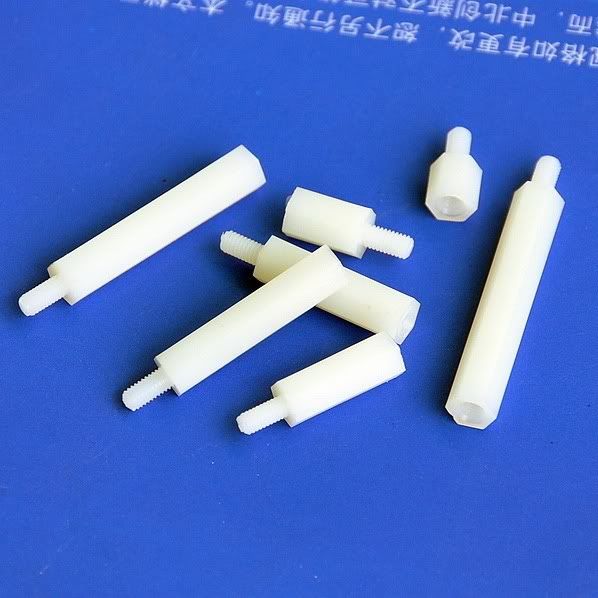
The red dots represent the nylon lugs. Commonly known as nylon standoffs mostly used for separating circuit boards in pcs. The reasons for this choice are, the nylon won't damage the camera. The standoffs can be built up in length allowing me to get around contours and obstructions on the D3

72a6c88c.jpg


I will also add a thin rubber Mat to the aluminium plate to prevent damage and minimise vibration and shake.
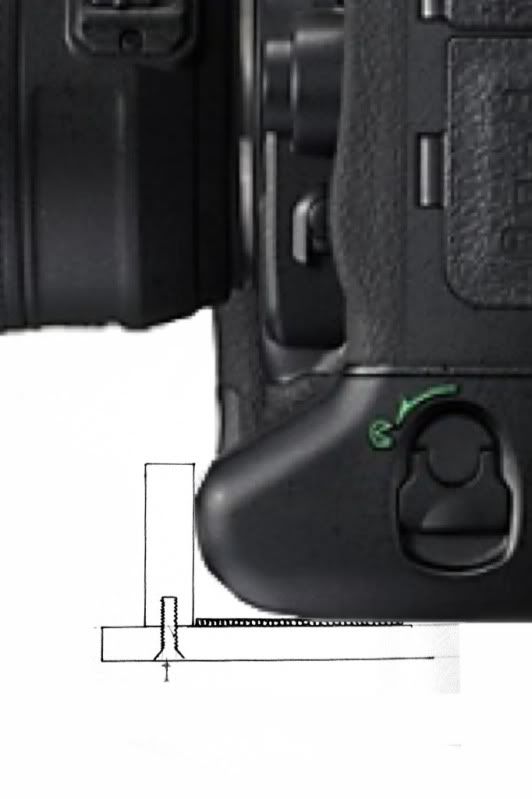
For extra security I will drill a clearance hole in the alluminium in line with the tripod Mount so a bolt can secure the camera flat to the base

A side profile (not to scale)

c487851f.jpg


So in my opinion this design will give.

- a sturdy platform
- exact positioning
- ease of mount and dismount
- full acsess to the cameras functions
- protection of the camera itself

To be honest the design of the bracket is not that important as long as it has a flat metal surface for bolting the business end on (the jig)

Once the bracket is in position on the wall we can set the cameras position and start building once you have decided there is no going back :)

Any other issues you can think of??

When do you want me round???
 
The only thing that i can think of that doesn't make it perfect is the fact that it might need to be tilted forward slightly, but that i suppose could be solved by just putting the camera slightly lower on the wall?
what do you think?
Otherwise... AMAZING! this is gonna be coooool :)
 
... so back to the actual photos!
I wonder if i could set up a action for batch processing to HDR? that could look quite cool?
but might not be so great from a medium jpg?
what sort of software to put it all together in order do we think?
 
Back
Top